Wednesday, December 25, 2013

Merry Christmas!

Here is this year's Christmas card!

This photo was taken at the mall behind the Santa Claus setup.  Most of Gracie's Christmas photos have been taken here.
Her hair looks so blonde here!

The top photo was taken here at home, fully on manual!  (Photog-speak for "I adjusted all the settings myself!"   [Nikon D7000, 50 mm 1.8 lens, 1/125 s, f/1.8, ISO 1600]

The bottom photo was taken May 2013 at the Laura Ingalls Wilder Home and Museum in Mansfield, MO.  My friend Valerie took the photo for us!

I ordered 4x6 postcards from http://www.gotprint.net. The set of 250 full-color on front and back postcards cost just under $50 including 2-day air shipping.  I bought boxes of envelopes from Walmart, 50 to a box at $4.50 each.  I still have lots left over even after mailing out a bunch and handing out a bunch at church.  I will take some to my mom's in case she wants to hand any out.  I'm very happy with the quality as well as the price.  The price per card + envelope comes out to be 30 cents each.

This Christmas season has not turned out exactly what I would've liked, in some ways.  I wanted to do a lot of fun activities, but due to a variety of factors, it just didn't work out that way.

I did manage to do the Elf on the Shelf thing.  Our elf is named Noelle.  Last year, Gracie called her 'Elle, I'm guessing because she usually hears, "No" in front of a name; hence, she thought I was saying, "No, 'Elle."  This year, she has done better, but has also called her "No-elf."  I picked the name because I thought it was pretty.  I didn't realize it would cause some confusion when Gracie heard "The First Noel"  "Mommy!  They're singing about Noelle!"

I use Noelle to deliver a couple of Christmas books each day.  Sometimes she gets into funny situations like tying Christmas ribbon to use for a swing from the ceiling fan or getting stuck in the M&M jar.  Other times she has fun reading to Pooh bear and other friends or taking Owl for a ride to the North Pole in the plane.  Several times, Noelle has written Gracie a note that is clothespinned to the Christmas tree.  It's fun to watch Gracie giggle over these antics.  I tell her "I like Santa Claus!  Santa Claus is a FUN game we play, isn't it?" I don't think it has sunk in that it's all make-believe, but she'll understand over time.

It's been fun to watch her grasp more details about Baby Jesus' birth.  Most of the Christmas books are about The Christmas Story, plus she's learned about it in Sunday School over the last few weeks.

I feel like I missed out on a several local activities this year.  I wanted to go to a live nativity program at a church in Germantown, but we had an ice storm that weekend.  I also wanted to go to Dickens on the Square in Covington, but Robert was sick that weekend (and then Gracie got sick, and then I got sick...).  We only rode around our neighborhood once to look at Christmas lights -- not very impressive compared to the animated lights and music displays that we have seen in the past in other areas.  I did take Gracie to see the Enchanted Forest at the Pink Palace museum today.  They have a variety of Christmas trees decorated by individuals or groups as well as a number of animated scenes and a gingerbread village display.

Gracie has really become excited about wrapping presents.  She helped me wrap some, and I let her wrap whatever she wanted to.  She wrapped pieces of cardboard tubes, her jack-in-the-box, some shoes, some socks, and I'm not sure what else.  I guess we'll find out when we open presents tomorrow!  She has been begging to open presents for the last two days.  That alone makes me glad I waited before wrapping presents.  She actually tore into her biggest present.  Fortunately, it was an Amazon box, so she didn't spoil her surprise (and I know she will be over the moon at that gift!).  After I set out her gifts, she wanted to know which ones were hers, so I showed her her name on one, and said, "You know how to spell your name.  Look on the other presents to find your name."  She enjoyed that, and it became a great exercise in name recognition.

Tomorrow will be somewhat of a low-key day.  As soon as Gracie wakes up and realizes it is Christmas, we'll go into the living room, open up stockings and presents.  We'll probably have chocolate chip pancakes and/or blueberry muffins for breakfast.  We'll play, play, play all day.  Or most of the day.  My husband has been diligently working on a project for work and he will probably devote some time to that.  I asked him what he wanted me to fix for Christmas dinner, and he said, "If you're feeling adventurous, you can try cooking lamb."  So that is party of his Christmas present.  Kroger's only had one kind of lamb, some lamb chops.  I found a recipe online for Lamb Tagine which requires about 8 or more different spices, five of which I had to buy, and, actually, one of those I refused to buy (saffron which costs $12 a bottle for two little pieces!).  I also got a turkey breast which I'll cook in the crockpot.  I'll be able to eat that and then freeze the remainder.

Merry Christmas to everyone!



Pin It!

Tuesday, September 17, 2013

Book Review: One Thousand Gifts by Ann Voskamp + Giveaway

A couple of months ago, I was approached by a publicist to read and write a review for the book One Thousand Gifts by Ann Voskamp.  I had heard of this book, and had read at least one or two glowing reviews for it (by a friend of a Facebook friend), so I accepted the kind offer.

Unfortunately, it has taken me more than a month to finish the book and only by sheer determination.  As a whole, it's not a bad book.  The author writes in a beautiful, poetical style.  She is definitely a gifted writer.  However, I had a hard time getting into it.


Here are the words that the publicist shared with me about Ann and One Thousand Gifts:

Aside from being a New York Times bestselling author and popular blogger, Ann is a homeschooling mother of six. She is no stranger to the difficulties of motherhood – and life.


In the book and on her blog, Voskamp shares her own journey through hard, dark days and hidden fears as she seeks to answer one of life’s greatest riddles: how do you discover joy—right where you are?
I'll share a few quotes, mostly from the beginning of the book.

p. 15:  "Satan's sin becomes the first sin of all humanity: the sin of ingratitude.  Adam and Eve, are simply, painfully, ungrateful for what God gave."

p. 29:  "How does one live ready, and always?  Yes, ultimately only Jesus.  Yes, this premature dying to self, birthing into the cross-life, the grace cocoon before emerging into the life unending.  Without this Jesus, no, no one can be ready."

p. 32-33: "That's what I was struggling out of nightmares to reach, to seize.  Joy.  But where can I seize this holy grail of joy?  I look back down to the page.  Was this the clue to the quest of all most important?  Deep chara joy is found only at the table of the euCHARisteo -- the table of thanksgiving.  I sit there long . . . wondering . . . is it that simple?"

For the rest of the book, she talks much about eucharisteo.

p. 48-49:  ". . . but he {Martin Luther} did say, "If you want to change the world, pick up your pen."  I just like that quote.  She used this quote to inspire her as she was listing her one thousand gifts from God.

p. 59: "And I see it now for what this really is, this dare to write down one thousand things I love.  It really is a dare to name all the ways that God loves me.  The true Love Dare.  To move into His presence and listen to His love unending and know the grace uncontainable.  This is the vault of the miracles.  The only thing that can change us, the world, is this -- all His love."

I stopped taking notes after that because I just wanted to finish the book already.

Eventually, towards the end of the book, she drew another conclusion about attainging joy through service to others and used the words of Tagore to describe it:  "I slept and dreamt life was joy, I awoke and saw life was service, I acted, and, behold, service was joy."

The last chapter is titled the joy of intimacy.  She writes as the first line: "I fly to Paris and discover how to make love to God."  If this chapter had been left out of the book, I could've given a recommendation of "it didn't jive with me, but maybe you'll like it."  With this chapter, based on some difficult experiences with a former preacher and his crazy theology, that chapter turned me just about completely off.  Still I read every word, well, mostly.

This review on Amazon pretty much says what I would like to say, only better.

Pin It!

Friday, August 9, 2013

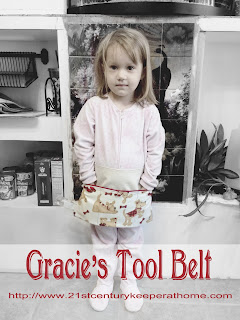
Gracie's Tool Belt

Ever since Robert let Gracie "help" with some of his projects and I gave her some small tools in her Christmas stocking, Gracie has been begging me to make her a tool belt.  I finally found a great tutorial online and made the time to make her one.


I made the tool belt like the one at One {hip} Mom, with a couple of changes:  I put red piping at the top of the pockets and the ties.  I also added three glitter buttons for decoration.


If I could do anything differently, I would put elastic in the hammer loop as it's rather big.  I would also sew the buttons on the pockets before sewing the pockets onto the main part of the tool belt.  That way I could've placed them at random places instead of just at the top.  I forgot to fold the ends of the ties, so I had to cut the ends with my pinking shears (zig-zag scissors).  I think they would've been too thick for my machine to sew anyway.

All in all I'm very happy with how it turned out!  Gracie is happy with it, and that's the important thing!  She immediately wanted to go out and "fix" her bike.


Pinspiration from One {hip} Mom

Pin It!

Monday, June 3, 2013

Rainbow Rice


This post is long overdue!  I can tell from the photo that I did this last summer, sometime after the Worst Haircut Ever (see story at bottom of this post).  This photo is so cute to me because she is wearing an old T-shirt that I owned as a child (when I was about 6 or 7).  She looks a lot like me at the same age.

There are many pins on Pinterest on making Rainbow Rice.  Some involve using rubbing alcohol and food coloring.  Others involve using Koolaid.  The best method for me was using the rubbing alcohol and food coloring.  The Koolaid one didn't work as well, and it smelled funny.

First you pour a little bit of rubbing alcohol (helpful hint: don't use the wintergreen flavored rubbing alcohol.  It has a funny smell.) in a bowl and drop at least 20 drops of your food coloring in (I did 30 drops).  The more food coloring you use, the brighter the colors will be.  Pour in your rice (and/or pasta) and mix well.  Pour the colored rice onto wax paper (which I put on baking sheets) and let dry.  You can stir the rice around until it dries completely.

As you can see, I used an old tablecloth on the floor just in case Gracie spilled any.  She had fun mixing and pouring.  To store, I poured it into two Tide Pods containers.

I recently got the rainbow rice out again for her to play with, this time I let her play on the kitchen table.  I bought an oil drip pan (a large round container that is fairly deep) at Dollar Tree to use for manipulative activities such as this.  It has a spout which makes for a little bit easier cleanup and is easy to wash up.

One of the best places to get cups and funnels, spoons and colanders, and other fun things to use for rainbow rice or sand and water play is Dollar Tree.  They are fun to use and not a lot out of pocket if they get lost or damaged.

"Worst Haircut Ever" Story
Gracie was born with hair, but not a lot of hair.  I have been patiently waiting throughout her short little life for her hair to grow out long.  I have been taking her to get trims since she was about 1-1/2 years old so that her hair can look nice and neat while it is growing out.  My favorite hairdresser got married and moved to Georgia about four years ago and it has been difficult to find a replacement at a price I don't mind paying.  (I'm cheap when it comes to paying for haircuts!)  One place I like is Fantastic Sams down past the mall towards Lakeland.  They have nice people and it is a very relaxing atmosphere.

Last summer, I discovered that there was a Fantastic Sams closer to us (Germantown Parkway and Dexter Road, next door to Kroger).  I decided to use them since they were closer.  The owner cut both my hair and Gracie's hair.  I told him, very specifically, that I wanted her bangs cut (out of her eyes) and the back of her hair only trimmed a little bit because I wanted to grow out her hair.  So what did he do?  He cut most of the back off of her hair, then combed her hair forward from the crown of her head covering her forehead and trimmed her bangs -- the exact opposite of what I told him to do.  Not only that, but who cuts hair like that?

He cut my hair fine, but he set back Operation Grow Long Hair back by a year!  Needless to say, I have not been back there.  They took my phone number, and I've always said that if they call me, I will tell them I will NEVER go back to them again!  Gracie's hair looks much better now.  The back is slowly growing.  She has bangs and the sides are cut at an angle while they've been growing out properly.
Pin It!

Saturday, June 1, 2013

Favorite iPhone Apps and Tips

I'm excited because my friend Valerie, who blogs over at Valerie Write Now, just got a new iPhone!  We have been tearing up the cell phone waves texting about different features, and I got motivated enough to want to write a blog post (or two or ten) about my favorite iPhone apps and tips.

A Few Tips

1.  Tip #1:  How to Take a Screen Shot
Hold down the home button and the power button at the same time and release.  It will "blink" and make a noise like it is taking a photo.  I use this all the time to save information (e.g. conversations on Facebook) to use at a later time or even to send to people.

2.  Tip #2:  How to Send a Screen Shot (or photo) to Someone
After taking your screen shot, go to your photo album, view your photo, select the little arrow in the bottom right of the photo, select message (or email or any of the other options).

3.  Tip #3:  Restrictions
If you have children, I recommend you go into the Restrictions (Settings, General, Restrictions, enter password) settings and turn the deleting apps OFF.  That way, when children use your phone, they cannot accidentally delete your favorite apps.  They will be able to move them around, but not delete them.  When you want to delete any apps, go into restrictions, turn it to ON, delete the app, and then go back and turn the restriction OFF.


Favorite Apps

Here is my home screen:

Home Screen
Here are the apps:

First Row:
Calendar:  I actually do not use this.  I do like how it always has the date on the icon.
Notes:  This app is great for taking notes.  You can have a lot of different notes.
Photos (Photo Album):   Your screen shots and camera photos are stored here.  Also, if you are on Instagram, you can tell it to store your Instagram photos.  You can also set up albums (took me forever to figure out how), but I don't really use that feature.
Camera:  Use this app for taking photos.

Second Row:
App Store:  The number on the icon (called icon badge) shows how many of my apps need to be updated.  This is where you will find and install your apps.
Paperless:  This is a great app for making lists.  I like it so much that I bought the paid version which I think was $2.99.
Cozi:  http://www.cozi.com  This is the app I use to put in appointments for our family calendar.  They have other great features, too.
Clock:  Timer, Stopwatch, and Alarm Clock.  You can set as many alarms as you want!

Third Row:
Instagram:  Fun app where users share photos (that have been edited with their special filters).  You can like and comment on others' photos.  My username is MrsKinsey.
Twitter:  Tweet here.  The only thing I don't like about this app is that I can't add specific users to my lists.  I have to do that on the computer.  My username is MrsKinsey.
Facebook:  Social Media aka biggest time waster ever, but oh-so-fun!
Show of Hands:  This is a fun app that has various polls with only two answers from which to choose.  You can view the stats for each question based on political party, gender, age, and income.  My username is MrsKinsey.

Fourth Row:
Pinterest:  I love me some Pinterest!  If you do, too, get this app!
Gmail:  I read my regular home email on here.
Words with Friends:  Fun game that is like Scrabble.  My username is AvaKinsey but you can find me through Facebook.  I like this game, but I'm also kinda off-and-on about playing.
Kindle:  I read my many ebooks on this app.

Fifth Row:
Pages:  Here is where I post and view my blog Facebook page and my photography Facebook page.
Amish Wisdom:  Fun app sponsored by author Suzanne Fisher.
Simple Bible:  My Bible app. (I'm pretty sure it's free.)  If you see me on my phone in church, I promise you I'm reading the Bible on this app!
Say the Same Thing:  New fun game.  You have to be Facebook friends with me in order to play with me.

Sixth Row: (The apps on this row show up on all of the screens.)
Phone:  For making calls
Mail:  I have a Gmail email account that I use only on the iPhone.
Safari:  iPhone browser
Messages:   Text messages

Second Page
While on the home page, if I swipe to the left, this is the next page:
 

First Row:
Settings:  This is sometimes called iOS Settings.  You control all of the settings for your iPhone here.  I may do a future post on specific settings at a later time.
YouTube:  View and post YouTube videos here.
Maps:  Look up locations and how to get there.  This app has a far better GPS than the one in our car.
Reminders:  I don't really use this, but you can set reminders here.

Second Row:
The Weather Channel:  View the weather forecast here.
Beat the Traffic:  View current road conditions for Memphis (and other cities, but I don't know which ones)
Roku:  I don't use this, but if we lost our remote, I could use this app to control our Roku.
Google Maps:  Another Maps/GPS app.

Third Row:
ShootLocal:  For photographers to find and post favorite photoshoot locations.
PhotoBiz folder:  Some of the apps I use for my photography business.

Another tip:  To put apps in folders, press down on the icon of an app and drag it over another app.  It will automatically make a folder and put both apps in that folder.  You can drag other apps into the folder.

Yellow Pages:  For finding the contact info and location of businesses.
Netflix:  My daughter's favorite app.  Actually, we all love Netflix.

Fourth Row:
Home Routines:  I don't use this much anymore, but it's great for people who follow FlyLady.
Royalty Rewards:  I don't even know what this is.  I will delete it.
Google+: I don't use this because I have little time to view the other social media things I belong to.  I probably ought to delete it, too.  I will put these apps in a folder called Delete and when I feel like it, I'll delete them all at once.
Weebly:  This is the editing app for my photography website.

Fifth Row:
Carbonite:  Free backup for your iPhone data and photos.  If you're very new to your phone, this is a great time to start it because otherwise it will take days and days (and so far, a couple of weeks) to backup the stuff on your phone.
BackBlaze:  This is the backup I now use for my computer.  I can view my backedup files using this app.
Mail2Group:  Set up groups of people to email to at one time.  One of the things that the iPhone email (and Gmail app) is lacking is how to email to the same group of people at once without inputting all of the names every stinkin' time.  I just downloaded this app so I haven't really tried it yet.  I send out Prayer KneeMail emails to our church members and this should be a great, easy way to do it when I'm away from my computer.
OurGroceries:  I haven't tried this app yet.  It's supposed to be a good app for grocery lists.


I have MANY more apps on my phone, but they will have to wait for another post.

Let me know if you have any questions or suggestions!


Pin It!

Wednesday, May 29, 2013

Preparing for a Disaster, Part 1: Backing up your computer


One of my biggest nightmares is the thought of losing my computer files, especially the thousands of photos I've taken over the years, and MOST especially, the ones of my daughter.  I know that it is inevitable that, one day, I will lose my files or they will be corrupted and irretrievable.  For that reason, I am making preparations to be able to retrieve my photos and files.

When we first bought our iMac two years ago, my husband also bought a Time Capsule (external hard disk drive) to be used to back up my computer files.  (You can read how to set it up here.)  It's been working great, for the most part. However, about a year ago, it had a problem where it couldn't find the backup files (gave me a heart attack!) and I had to make it start a brand-new backup on the Time Capsule.  It has very recently been telling me that it is running out of room and has been deleting the oldest backups.  What I plan to do is to reformat the drive and start over with a fresh backup of the computer.  Before I can do that, I need to have an online backup of my computer files.

I know what you're thinking!  "Shouldn't the external hard drive be enough?  Won't an online backup be overkill?"  Remember, I collect photos like some old ladies collect cats.  Also, if you are a mother, you know how precious photos of your children are to you.  Besides that, what if we have a fire and the Time Capsule is lost forever?  What if someone breaks into our home and steals my computer and even the Time Capsule?  There are far too many frightening scenarios to think about that warrant the extra backup.

A few weeks ago, I began a trial run with Carbonite.  It offers behind-the-scenes backup of not only your computer, but your smartphone as well.  You do not have to have a paid account with Carbonite to use the smartphone app.  It is a free app!  There are several different levels of service from which you can choose to backup your computer.  I had one day left of my trial left when I started to upgrade to the paid service.  I was || this close to closing the deal when I discovered that, for some reason, it did not let me choose the Home Plus option which I wanted so that I could also back up an older external hard drive that I used to use with our PC laptop.  I found out from their customer service chat line that the Home Plus and Home Premier services are only available for PC/Windows-based computers, not Macs.  Not only that, but if you change your mind mid-year, they will not issue a refund.  Scratch that and back to square 1.

Through some searching of reviews (including recommendations from fellow photographers), I found out about BackBlaze.  It, too, offers a trial period, and is more economical than Carbonite.  It is a great service, and allows you to back up your external hard drives as part of the service (for PCs and for Macs).  You may add on additional computers for an additional $5/month per computer.  I just upgraded to the paid service ($95 for two years) and am still waiting for the initial backup to be completed.  Once the initial backup is completed, I will feel secure enough to reformat my Time Capsule and begin that anew.  I could also start backing up my older external hard drive -- and probably should -- but I want to reorganize the files on it first.

Summary of my Recommendations to You:

1.  Get an external hard drive to use as an on-site backup of your important files.  Backup often.  If you're really paranoid concerned, get two external hard drives and alternate backing up to them, keeping one of them offsite (in the care of a trusted friend or family member).

2.  Use an online backup service such as Carbonite or BackBlaze.  Carbonite has a free app that you can use to back up your iPhone.


Pin It!

Tuesday, April 16, 2013

100,000 views!

Thank you, everyone, for letting me surpass 100,000 page views on this blog!

My 2nd Blogiversary was last Friday, April 12th, but I was so busy, I didn't get a chance to post.

I will be doing a giveaway soon.  Stay tuned!
Pin It!

Saturday, April 13, 2013

How to Lock or Unlock Multiple Files on the iMac


I have not blogged about this, but I have recently gone semi-pro with my photography, obtaining a business license, and getting things set up to have a side business.  I had a photoshoot last week with a sweet, beautiful, fun little 14-month-old.

I am now in the process of editing her photos, and have to be very careful that I do not overwrite the original files.  I know that I can do a right-click on each file in Finder, select Get Info, and put a checkmark by Locked to lock the file so that it cannot be changed.  (For Windows people, you do something similar, but the term is Read Only rather than Locked.)  I took nearly 200 photos and really did not want to do that for each and every file (I'm so OCD that I want to do that for even the photos that should be deleted due to blinks or photobombs by my daughter).

I did a search for how to lock or unlock multiples files and found a great, easy solution:


First, select all of the files by doing Command-A.  (Hold down the Command key, press the A key, then release both.)  A is for All.


Secondly, do Command-Option-i (Hold down the Command key, hold down the Option key, press the i key, and release all keys.)  i is for Info. This box will show up.


If you want the files to be locked, put a checkmark by the word Locked.


You may then close the Info box.

When you look at the files in Finder, you will see a little padlock by the file to show that it is locked.


Even in a different view of the list of files, you will see the padlock.
That is my daughter Gracie.  I took her Spring Photos last week as well, but I have not yet edited them.  Yes, I know the hat doesn't match, but she likes it, and I like for photos to represent what Gracie is really like.


Pin It!

Wednesday, April 10, 2013

Gracie's New Closet


A little over a week ago, my husband took care of a much-needed project: redoing Gracie's closet!

As you can tell from the photos below, her closet was messy and there was a lot of unused, inefficient space.


I used a cheap white shelving to hold some of her toys.  The laundry basket holds her stuffed animals that she doesn't play with very much.


The grey box in the lower right holds Gracie's clothes that are too big for her right now.  On top of that is a stack of pillows, blankets, and a basket that we use to gather up her things from the rest of the house.

As you can see, the top of the closet is not used at all!

After Robert painted Gracie's room and closet 3-1/2 years ago (when I was pregnant with her), he did not put the (old, ugly) closet rod back in.  I bought a shower tension rod to use until we could redo the closet.

Now that Gracie is older and is able to put her things away when I tell her to, it was time to fix up the closet.  I was tired of all her stuff being scattered all over and there not being a planned space to put them away.


After we bought the closet system from Lowe's, I cleared out the closet in preparation for my husband to install it.  Gracie was excited about her new place to play and wanted to sleep in her closet that night.

While I had everything cleared out of her closet, I took the opportunity to go through her clothes, put away her clothes that were getting to small, and getting out the next sized clothing.  I love doing that because it's like Christmas to see her new things.  I shop the clearance racks, thrift stores, and yard sales for larger clothing, and then will fill in the gaps at a consignment store or retail store.

This cubbyhole is for Gracie's shoes.  She is familiar with the concept since she has to put her shoes in cubbyholes at the Chick-Fil-A playplace.  She loved putting her shoes away, and was disappointed that she had a hole left over!  She has since done a pretty good job of putting away her shoes.  She has also put socks in with her shoes, presumably to make it easier to put on her socks and shoes.  I thought that was a pretty clever idea!

The only thing I don't like about the shoe cubby is that part of it is behind the front wall which makes it harder for me to reach in there.  I originally wanted it to be hung on the side wall so that it was perpendicular to where it is now and facing towards the middle of the closet.  We may have to change that at some time in the future.


The finished closet!  I have a shelf at the top which has a couple of bins and some boxes of toys (blocks and building logs).  The side shelves also have toys.  The blankets you see have been moved to a large drawer in her dresser.


The top closet rod has Gracie's church clothes.  Her Sunday clothes are on the left, and her Wednesday night clothes are in the middle of the closet.  The bottom closet rod has dresses that she can wear whenever she wants.  She also has other clothes in her dresser.  She also has a backpack ("like Baby Drew's!") for toys to take somewhere. (Baby Drew is our little friend at church.  He brings his toys in a similar backpack to our ladies prayer group each week.)

On the floor she has her box of larger clothes (winter clothes for next year as well as up to two sizes larger for the following year or two), her suitcase (which she loves to pack to pretend she is going to her Mia's), and her laundry basket.  I'm glad I can get the laundry basket out of the main part of her room!

On the back of the closet door is a hook from which I have her portable DVD player case.  (The DVD player is actually on top of the bookcase in her room.  I'm too lazy to put it in the case!)  I also have a couple of Command hooks which hold her favorite sweater and a hoodie.

One day soon, I will do a post showing her room.  I still have a few things I want to tweak before I do a full post on it.
Pin It!

Friday, March 22, 2013

Hooded Baby Bath Towel + Baby Doll Blanket


When I was pregnant with Gracie, my sister-in-law made a hooded baby bath towel similar to the one above.  It was one of my favorite gifts and is one that I enjoy making and giving to other expectant mothers.  It's pretty easy to make.  I will show you how I made the one above and give tips on how to make it more easily (fewer mistakes) which I figured out the next time I made some.

Hooded Baby Bath Towel

What you need for one hooded bath towel:

  • A large bath towel
  • Half of a handtowel
  • matching thread
  • A roll of ribbon

If you are making two hooded bath towels, you will need:

  • Two large bath towels
  • One handtowel
  • matching thread
  • Two rolls of ribbon

Step #1:  Sew the ribbon onto the towels first.  This will help you see which side is the right side of the towel.

For the large bath towel, sew ribbon across the width at both ends.  If the towels have the decorative stripes on them (like below), it makes it very easy to sew the ribbon over that.  If the towels do not have the decorative stripes, you have to measure and make sure it's straight.  You also have to be careful when sewing to make sure your seams are straight.


For the handtowel, sew across one end, or, if making two hooded bath towels, sew across both ends.

Step 2:  Fold the large bath towel in half with RIGHT SIDES together.  (The ribbons should be on the inside.)  Measure 8 inches over from the fold and pin.  You will sew a line going down 6 inches.

Measure 8" from the fold and sew a line going 6" down.(The photo shows the ruler measuring 4" - ignore that.)

Step 3:  Pinch the top part together so that it folds evenly over the seam.  See photo below.  Now sew along the edge to sew the layers together.


Step 4:  Measure over about 9-1/2" inches from each end of the handtowel and cut that piece off.  If you are only making one hooded bath towel, you can save the other half for another project.  If making two, you will have two pieces from the ends plus a smaller piece from the middle.

In this photo, I cut the hand towel in half across the width before measuring over 9-1/2" and cutting that piece off.  I prefer not to do it that way anymore.

Step 5:  Fold the handtowel in half right sides together.  Sew down the cut end to make a hat shape.  I used a zigzag stitch to make it strong.

Step 6:  Pin the handtowel hood to the bathtowel with RIGHT SIDES TOGETHER.  Make sure the middle of the handtowel lines up with the middle of the bathtowel.  This will be difficult to sew since there are so many layers.  Sew slowly and carefully.  I actually broke a needle doing this step.


 Here is Gracie modeling the hooded bath towel.


I made this hooded baby bath towel for a lady at our church who is expecting her first child.  I knew that Gracie would be excited about the Winnie the Pooh ribbon, so I decided to take the leftover handtowel piece and make a baby doll blanket for her.

I later made another Winnie the Pooh hooded baby bath towel for a lady in church whose grandson had a baby.  I made two at once and have kept the extra one for future baby showers.

I also made a camouflaged-theme one for a friend of mine who had a baby boy.  I used tan towels and camouflage ribbon.  I don't have a photo of it, but if she takes any photos with her baby, I'll post it here.

Baby Doll Blanket

Step 1:  Take double fold bias tape (which I already had on hand), open it up, and pin right sides together to the cut end of the towel.  Sew.


Step 2:  Fold the double-fold bias back so that it covers the cut end of the towel.  Sew the other side.  I did it pretty quickly so my stitches look pretty ugly.  (Gracie doesn't care!)


Step 3:  Sew the ribbon across the towel.

Gracie wanted to help put the ribbon on the towel.  It actually goes straight across and not folded back as shown in the photo.


She was happy with her baby doll blanket and put it to good use right away.


Pin It!

Saturday, March 16, 2013

Blog Post Roundup

Here are a few posts I thought y'all might like to read.


Friendship Must Be Wooed @ All Things Laura Ingalls Wilder

The Right Choice @ Simplicity & Celebration (This is a MUST READ and SHARE article!)

Professional Backslappers @ The Pastor's Perspective

When You Feel Inadequate @ The Better Mom

Winds of Change @ Valerie Write Now

10 Things Moms Should Never Feel Guilty About @ Better in Bulk

Being Busy & Knowing God @ Journal for Women

When You're Spiritually Numb @ Encouraging Words

8 Ways to Help Those Who Grieve @ Encouraging Words

Pin It!

Friday, March 1, 2013

Cake on the Beach

I made a dessert that I haven't made on several years. It is SOOOOOO good!

I got it out of a Hungry Girl book from the library.

This recipe makes 3 servings which is just right for our family (or would be if Gracie would eat it).

Ingredients:
1/2 cup yellow cake mix
1/4 cup vanilla yogurt
1 T water

About 1/4 cup crushed pineapple
1 Jello sugar-free vanilla pudding (which is amazing by itself!)
1 T shredded coconut

Mix first three ingredients in a small bowl. Divide among three small bowls. I use Gracie's plastic baby bowls. Put the three bowls in the microwave and nuke for 45 seconds. Let sit for five minutes.

Poke some holes with a toothpick. Add a layer of crushed pineapple and then a layer of pudding. Put in the fridge for at least an hour.

When ready to serve, garnish with coconut.

Robert suggested to add marshmallows which made Gracie very happy. She tried eating just the marshmallows because the cake didn't pass the sight test. That's ok: more for me!


Pin It!

Wednesday, February 27, 2013

"I Stopped Crying!"

"No! I don't want to!"
"I want the other one!"
"I want you to stay!"

You mothers of toddlers know what it's like to hear whining, griping, complaining, and crying all the time.  Oh, the crying!  It's a struggle to try to figure out how to placate them while still maintaining your authority.

Several months ago, when Gracie would cry, I might offer an alternative.  She could turn the tears off like a faucet, and she would say, "Mommy! I stopped crying!"  I found myself making sarcastic comments in return.

Then, one day, it occurred to me that for Gracie to stop crying was actually a good thing.  That's what I want: for her to learn self-control and to adjust her thinking and attitude to being happy even in less-than-desirable circumstances.

Now, I still try to offer alternatives or things to think about or sometimes I just ignore the tears.  A few minutes later, when Gracie has directed her attention to something else, she will happily say, "Mommy, I stopped crying!" and I will happily praise her for being a big girl.  Now we both have smiles on our faces!

"...but David encouraged himself..." I Samuel 30:6
Pin It!

Monday, February 25, 2013

Protect Your Identity

When I was first married, Robert told me to use his shredder to shred anything with any kind of personal information on it.  I regularly fill up and dispose of several bags of shredded paper each year.

I have recently been wondering should I bother with shredding the address labels from magazines and other pieces of advertising that I get.  I did a search and came up with these helpful articles:


Learn What to Shred

Secure Paper Shredding to Prevent Identity Theft

How to Shred Documents and Stop Identity Theft

8 Things You Should Shred Right Now

One surprising thing I learned is that it is perfectly legal for people to dig through your garbage.  The short answer to my question is this:  If in doubt, shred it!

One tip to help with cleanup is to keep an appropriately-sized trash bag in the shredder can.  You can keep empty trashbags under the one being used so that you always have another one hand to replace the one being disposed.

Another tip is to go to DMAchoice.org to remove yourself from mailing lists.

Pin It!

Menu Planning

What takes up the most time, or what do you dread most, in meal planning? For me, it's figuring out what to cook.

All too often I feel uninspired, and I fall back on the too-easy, no-brainer, not-exactly-healthy meals such as oven pizza, chili dogs, oven fish, or tacos.

I have tried planning for each specific day only to have my plans messed up. It may be that my schedule unexpectedly changes, I have had an exhausting day, or I am not able to buy the groceries on the day I want to.

I think I have finally found a system that works.

Let me go through what I've done for March. This is not a typical meal plan because I decided not to use any of my Keeper recipes this time. Otherwise, that would be the first thing I would look through.

On a small piece of paper, I mark column headings for main dishes and extras divided by the four weeks in March (Week 4 is on the back of the page).

My goal is to find six main dishes and about as many extra dishes such as sides, snacks, and desserts for each week.

First, I look through my collection of keeper recipes to see what I want to make. (I did not do this for March.)

Then, I look through Pinterest and will move pins from my recipe boards to my Do in March board to make them easier to find. On the paper, the name of the recipe is preceded by "P" for Pinterest. (This is also a good opportunity to cull pins that I'm not interested in anymore.)

Then, I look through my paper files of recipes to try. I put "New" before the title on the paper, and I put those recipes in my desk drawer so they are easy to find.

If I had easy access to my cookbooks I would look through there as well. (Here's why I don't.)

Once I have my meals planned for the month, I keep the list on the side of my fridge.


My Walmart Shopping List
Each week, I look at the recipes and make out my shopping list. I have a form that I use that allows me to write in items for each area or aisle of the store. It helps save some time.

As I make a recipe, I cross it off my list. In general, I try not to serve two similar dishes in a row (chicken or beef, for example). I also like to do one crockpot meal each week, usually on Thursdays.

I like this system because I don't feel locked in, and it offers some flexibility. Sometimes I'm not always able to make all of the meals, but I try not to let it bother me. I just have to be careful about taking care of the perishables so that they're not wasted.


You may wonder about breakfast and lunch. I am very casual about these meals and usually eat cereal, leftovers, or canned foods (like spaghettios). I eat out for lunch once or twice a week. My husband usually takes leftovers to work (which is great if I didn't care for a meal).  My daughter has a repertoire of snacks (both healthy and not) that she eats.  She is getting better about at least trying the food that we have.

I also have a "groceries to check" list on my fridge of items we use on a regular basis like bread, milk, juice, fruit, and granola bars, among other things.  I check the items on this list and add them to my shopping list if we are running low.

I don't like to cook on the weekends, especially on Sundays, so we usually eat leftovers or will go out to eat. We are trying to cut back on eating out to help our budget and having a meal plan definitely helps.  It also helps to be able to only go grocery shopping once a week.  When I feel up to it (which isn't often), I will shop at Aldi for some things before going to Walmart.

Do you have any tips to share with me that have helped you?


Pin It!

PrintFriendly