Wednesday, December 31, 2014

15 Goals in 2015

Happy New Year!

A friend of mine (Susan of ByGrace) posted recently about 15 goals to complete before 2015.  I liked the idea, but I knew it would be impossible for me to complete what with all the Christmas prep, illnesses, and everything else going on.  However, I then thought that it would be fun to come up with 15 goals to complete next year.

Here is a list of my goals.  I brainstormed the other day and then finally honed them into a list this morning.  Granted, it's a little more involved than a simple list, but

1.  To read the Bible consistently and all the way through.

2.  To participate in a personal Bible study.

3.  To declutter and organize the house, garage, and shed.
     a.  Declutter 365 (Facebook Group, Webpage for January)

4.  To increase opportunities to grow my photo business.
     a.  3 new clients
     b.  Prints to sell for home decorating and postcards
     c.  Garage studio
     d.  Themed mini sessions

5.  To improve my photography taking and editing skills.
      a.  Project 365 (My facebook group)
      b.  Shoot in manual mode more often.
      c.  Go through book tutorials (Digital Photography Masterclass)
      d.  Study photography tutorials on Pinterest.
      e.  Edit using Lightroom.

6.  To complete 15 crafts or projects (and blog about them).
      1.  Two to three photo books.
      2.  A dress for Gracie
      3-15.  To be determined.

7.  To read 15 mentally-stimulating books (i.e. not fiction) (and blog about them).
      a.  Free to Choose by Milton Freidman
      b.  A book by David McCullough
      c.  41: A Portrait of My Father by George W. Bush
      d.  Unbroken: A World War II Story of Survival, Resilience, and Redemption
      e.  Pioneer Girl:  The Annotated Autobiography by Laura Ingalls Wilder
      f.   A Little House Traveler:  Writings from Laura Ingalls Wilder's Journeys Across America by Laura Ingalls Wilder
      g.  Gifted Hands: The Ben Carson Story by Ben Carson
      h.  Laughs, Luck...and Lucy:  How I Came to Create the Most Popular Sitcom of All Time by Jess Oppenheimer
      i.   Life Skills for Kids:  Equipping Your Child for the Real World by Christine M. Field
      j.   The Lost Colony of Roanoke by Jean Fritz
      k.  To be determined (please comment with suggestions)

8.  To begin reading all of the Caldecott Medal books in order.
     Next year, we may read the honor books, and when Gracie is older, we will read all of the Newberry Medal books.

9.  To lose 15 pounds.
     a.  No sugar, starch, or soda. (When I say "no," I mean heavily restrict.)
     b.  Drink more water.
     c.  Begin exercise program. (Kettle Worx, Jillian Michaels, walking)

10.  To provide 15 social interactions with Gracie's and my friends.
       a.  Play dates
       b.  Game parties
       c.  Craft parties
       d.  Gracie's birthday party

11. To increase opportunities to serve others.
       a.  Help Mama declutter and with large projects.
       b.  Write notes.
       c.  Visit shut-ins.
       d.  Operation Christmas Child

12.  To complete K4 and begin K5 (Abeka Homeschool).

13.  To increase opportunities for Gracie's extra-curricular activities.
        a.  Swimming lessons in the summer
        b.  Violin lessons (maybe this spring, but possibly beginning in the fall)
        c.  American Heritage Girls in February
        d.  Soccer in spring and/or fall

14.  To prepare for unexpected events. 
       a.  House inventory
       b.  Will
       c.  Emergency prep

15.  To begin writing a book.
I have no idea how many of these goals I will successfully complete, but I think that it will make 2015 a fun, productive year!
I will try to give weekly updates on Saturday nights.
Will you be attempting any goals this year?
Pin It!

Thursday, December 25, 2014

Merry Christmas!

Every year, I take Gracie's photo behind the Santa display at the Mall, and, usually, I use it in our Christmas Card.  Gracie will be 5 in January.

 The family photo was taken by my niece Kaylee when we visited California for her high school graduation.  She is studying photography and has her own Facebook page.

My baby girl is now in K-4.  I have been homeschooling her this year using the Abeka curriculum.  We enjoy it very much!  I had been wanting to take photos at the Davies Plantation which is located 10-15 minutes away.  I finally took the opportunity just days before they closed for the winter.  I look forward to going back in the spring to take more photos!

Merry Christmas to all my readers!

Pin It!

Monday, November 3, 2014

Contacts Sync for Google Gmail // Organizing Contacts into Groups


When I did my series on {Almost} Paperless, I mentioned an iMac app, Cobook, that I used as an Address Book on my computer.  They made an update to the app and changed their interface.  I didn't like it, and I didn't like how they imported my Facebook friends into the app resulting in many contacts with little data (just links to their Facebook profiles which is not useful to me at all).

I did some searching and found an app that has worked really well for me.  Contacts Sync for Google Gmail is an app that syncs the contacts in my Gmail address book with the Mac app Address Book as well as with iCloud.  This results in my iPhone, iPad, and iMac all being synced together.

Contacts Sync for Google Gmail has apps for the iPhone, iPad, and Mac.  If you have a Mac computer, then you only need the app for the Mac.  You can use the resident app Address Book to organize your contacts into groups, and then use Contacts Sync for Google Gmail to sync them to your gmail account.  You may have to go to your gmail account (on the web) to find and merge duplicate contacts.  The initial setup can take a while while you tweak everything, but after that, it works like a charm!  You do not even have to have Contacts Sync for Google Gmail up and running all the time (although you can since it does offer Auto-sync).  If you do not use Auto-sync, be sure to sync every time you make changes to your address book or to your iPhone contacts.

If you do NOT have a Mac computer, then you will use the app for your iPhone or your iPad.  I can't help you any further with setting up groups.

Organizing Contacts into Groups (using the Mac app Address Book)


For best results, I set Address Book up to only show my iCloud contacts.  Here is the Preferences window:


When I enabled my Gmail accounts, it showed duplicate contacts (since they were all synced together).  Having only my iCloud account enables just makes it easier.

Below is a screenshot of my Address Book app showing how I have organized my contacts:


I have several main categories:  Business, CBC - my church, Christmas Cards, Church - other people/organizations besides my church, Family, Friends, Miscellaneous, OCC (Operation Christmas Child), and OtMP (my photography business).  Most of these are further subdivided into subcategories.  (The My Contacts category is one that Gmail generates on its own every time I add a new contact on my phone. It's somewhat useful for finding new contacts that need to be put into my groups.)

First, I put every contact into a main category (Ex: Business - all) and then I also put them into the appropriate subcategories.

The only thing I do not like about Address Book is that it does not tell me on the Contacts view all of the groups that the selected contact is in.  I have to go to gmail.com to see that.  I have not yet checked all of my contacts to make sure they are in the correct groups, but I know it will be somewhat tedious to use gmail.com and Address Book; however, once it is all set up the way I want it, I shouldn't have any problems after that.

One final piece of advice:  while you are reorganizing your contacts and are tweaking your groups, make sure you save a backup of your contacts before, during, and after the process.

Pin It!

Tuesday, July 22, 2014

DIY Dry Erase Menu Board


I made this dry erase menu board in less than 10 minutes -- if that!

I saw a package of 3 small dry erase foam boards in the office and school supply section at Walmart. I think they were $3-5 or so.  I had already been wanting to put (another) dry erase board up there. I have a couple of old ones whose magnets are pretty cheap.  After picking up the set of 3 boards, I went over to the craft aisle and found a package of 12 adhesive round magnets.  I already had the duct tape on hand to make the border.  One tip, snip the tape at the end lengthwise and rip it down the middle. You can use the outside edges for the front of the board and wrap the ripped edges to the back where they cannot be seen.  

I already had these Dr. Seuss notepads from Target's dollar spot.  Rather than have them go to waste, I am using them for two other purposes.  The one on the left will be my list of Kitchen prep tasks.  For example, I just bought some chicken and hamburger in bulk from Sam's Club today, so I need to repackage them into meal-size portions.  I will cook some of the hamburger before freezing it which helps make cooking supper go a lot faster!  The pad on the right is for my list of leftovers and other perishables that need to be eaten before they go bad.

Pin It!

Thursday, July 10, 2014

ISO Sensitivity (for the Nikon photographer)

I've been a happy user of the Nikon D7000 camera for a couple of years now.  I love learning how to take better photos with my camera.

Most of my learning has come from trial and error as well as reading numerous web pages.  If you follow me on Pinterest, you may have seen my photography boards where I pin web pages that I have read or that I want to read.

The best paid resources I have used and that has been the most help to me is found at Capturing Joy with Kristen Duke.  She has two books (both print and ebook form) for the beginner and intermediate photographer as well as a video workshop.  I have purchased all three and they have been a big help to me!  (I also had the privilege of meeting Kristen and her kiddos when they came through Memphis last week!)

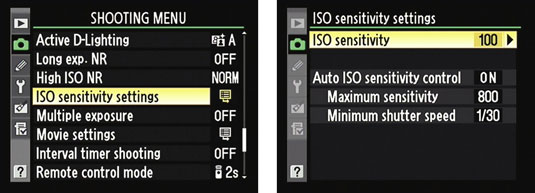
One particular screen in my camera menu has always confused me.  Here it is:

image1.jpg'

I understand what ISO is for (sensitivity to light -- the higher the number, the more sensitive it is to light) and that it's part of the so-called exposure triangle (along with aperture and shutter speed) used to generate properly exposed photos.  The more available light you have, the less sensitive the ISO needs to be.  For example, if you're outside in bright light, you can most likely use an ISO of 100; the less light you have, the higher the number should be.  The Nikon D7000 has a button marked ISO which you press and then rotate the Main control dial to change the ISO.  Which one is the Main control dial? The one that changes the number.  It's either the front (Aperture) one or the back (shutter speed) one.  Try both and see which one changes the ISO.  (I think it's the front one.)

In the ISO sensitivity settings menu, as shown in the graphic above (which I totally copied from another web page since I don't know how to get screenshots off of my camera),  I couldn't figure out what ISO sensitivity meant in conjunction with the Auto ISO sensitivity control.  "Does that mean it will change the ISO in increments of 100 or whatever number you select?"  The ISO sensitivty selection goes from 100 all the way up to the highest setting available (Hi 2 which is equivalent to ISO of 25600.

The Auto ISO sensitivity control is easy enough to understand.  This setting allows the camera to take over and change the ISO when the current settings will not take a properly-exposed photo.  You can set the maximum sensitivty (the highest ISO that you will let the camera to set) and the minimum shutter speed (the slowest that you want the shutter speed to go).

Well, my confusion was for nought.  I was basically over-analyzing what the menu setting was for.  This webpage explained it to me.  The ISO sensitivity is simply another way of choosing the ISO setting.  That's it.  You can either press the ISO button and turn the Main control dial OR you can go to this menu and select your ISO setting.  I feel kinda dumb that it's that simple, but I also figure there's probably at least one other person in this world who is confused by that as well.

Last week, our family went on vacation to Birmingham to visit with family.  We did lots of fun things, and I actually managed to shoot in manual mode the whole time. (Shooting in manual is not very difficult in theory, but it does take careful observation of several things including ISO and the exposure meter.  I usually prefer to shoot in Aperture mode which is easier for me.)  I have not yet uploaded my photos to my computer, but I am looking forward to seeing how they turned out.  One of the places we went to was the McWane Science Center which is a great museum for all ages.  The only bad thing (from a photography point of view) is that most of the lighting was garbage.  Too dark and wonky white balance.  We also went to the Birmingham Zoo (where I rode a zip line for the first time!!), and I'm confident that (most of) these photos turned out well.

If you want to see any of my photo sessions, please visit my Facebook page for my photography business Over the Mantle Photography.
Pin It!

Saturday, June 7, 2014

Homemade Rice-a-Roni & Porcupine Roadkill

One of my favorite easy-to-make, no-brainer meals is Porcupine Roadkill.  Gross name, right?  The original dish was called Porcupine Balls because you formed meatballs and cooked them in Rice-a-Roni.  Over time, I got lazy and quit forming the meatballs and just cooked the meat as it was.  I amused myself by creating the name Porcupine Roadkill.  It's quite good.

Not too long ago, I found a pin for making homemade Rice-a-Roni packets.  I used the recipe to make my Porcupine Roadkill, and we all liked it well enough to keep it.  A few days later, I made about 8 or so packets using the ingredients that I had.

Rice -A Roni Packets -- My version

3/4 cup rice (instant brown rice)
1/4 cup broken angel hair pasta
1 Tablespoon minced onion
1/4 teaspoon garlic powder & Italian seasoning
3 cubes beef bouillon

This will just fit in a small snack-sized ziploc bag.

When I made this the first time, I only had chicken bouillon powder.  It tasted ok, but I think the beef bouillon will work better.  I left the cubes in the ziploc bags, because I was too lazy to peel the paper off and crush them.  I'm hoping that when I make it the next time, I won't even have to crush them, just let them dissolve.


Porcupine Roadkill
 
For Porcupine Roadkill, you will need 1 pound of hamburger meat and 1 packet of Homemade Rice-A-Roni plus about 1 cup of water (more or less - eyeball it).

Cook and drain the hamburger, chopping it into pieces.

Add the Rice-a-Roni ingredients (don't forget to peel the paper off the bouillon!) plus the water.

Bring to a boil and then reduce to simmer until the rice is cooked.

Source of Original Pin (with more info about different types of rice)

Pin It!

Monday, March 31, 2014

{Almost} Paperless Organizing: Evernote, Part 3 (Post 5)

I knew that Evernote would take some time to talk about.  This is post #3 and we've barely got into it.

I will continue talking about the tags that I use to mark my notes in Evernote.

Last time I talked about .Tickler File tags, .What tags, and, my favorite, .When tags.


.Where tags
The .Where tags are what David Allen (of Getting Things Done fame) would call context tags.  In other words, where you will be when you need to do this.

.Where tags

@Computer means that this task or project will require me to be at my computer.

@Home means I will do this at home.  (I used to also have an @Errands tag, but I have begun putting my Errands on Wunderlist.)  In a way, I think this tag is kind of unnecessary, but I saw someone else use it, so I thought I'd give it a try.

@Kitchen Again, most likely unneccessary.

@Mama's  This is for when I go see my mom.  I have a few ideas of places to visit.

@Phone  Phone calls.  Self-explanatory.

Out of all of these, I'd say that the @Computer is the one that is most useful to me.

.Who tags
I only have two .who tags:  Family and Gracie.  I only have one note tagged with Gracie.  This set of tags is ideal for people who have outside jobs and do projects with other people.

.Misc tags
These tags are for when you need to tag it with something, but the .What, .When, .Where, and .Who may or may not apply.  These tags are very important.

My .misc tags
Again, the . in front of .misc means that it is a category header only.  I have seven categories under .misc tags.

.correspondence   These are emails written to me.  So far, this is only for the correspondence from the little girls we sponsor through Touch a Life.

.important info  Eventually, I may further subdivide this category.  I know I need to subdivide the notebook that is called Important Info.

.notes  There are three further subcategories:  Church (for sermon notes), Ladies (for notes taken during our Ladies Bible Studies), and Quotes which I haven't even used yet.

.projects This is my favorite new tag.  I came up with these on my own (You saw it here first!).  I have three subcategories:  Big projects, medium projects, and small projects.  Big projects are those that are going to take multiple days to complete.  Medium projects will likely take one day, and small projects take just a few minutes or maybe no more than an hour.  These tags combined with the .when tags (1-Now, 2-Next, etc.) is very useful for effective productivity.  Look below and you'll see what I mean:


From this list of my big projects, I can see that the most important one I need to do is catching up on my checkbook (recording transactions into my financial program).  After that, I can work on organizing my file cabinet, and so on.

I can look at a similar list of medium projects and know which ones are important to do soon and which ones can wait.

.receipts are further subdivided into Not For Taxes, For Taxes, and Photo Biz Receipts.  When I get an electronic receipt, I tag it with one of these tags and then stick it in the appropriate year notebook in my File Cabinet stack.

Eventually, I want to be able to scan receipts and put them in Evernote.  This will hopefully help during tax time.

.recipes  I have a bunch of tags under the heading of .recipes.  Look below for the first division:


.Dish type
  • Appetizers/Snacks
  • Beverages
  • Desserts (further divided into Cakes, Cookies, Misc Desserts, Cupcakes, and Pies)
  • Household Stuff
  • Kids Play
  • Main Dishes (further divided into Beef, Breakfast, Chicken, Main Misc, Pasta, Seafood, and Soups)
  • Mixes
  • Sides (further divided into Breads, Fruits, Potatoes, and Veggies)
.Events
There are two subcategories for .Events: Holidays and Potluck.

.Prep Type
Here are the subcategories:  Canning, Crockpot, Easy, Grilled, Make Ahead and Freeze, and Make Ahead Partially.

Tips are for meal tips.

.temp tags  There is just one subcategory: Is in Dropbox.  This is when I thought I was going to use Dropbox to house my recipes.  So, another tag is obsolete.

As you can see, tweaking Evernote to work is an ongoing process; however, it is well worth it!  I love being able to have my brain and more accessible and laid out in such a way that I can make good decisions about prioritizing my projects and tasks.

One final tip
In order to be able to access my most used notebooks and tags, I put them in the shortcuts area of Evernote.

Shortcuts make it easy to find my most used Notebooks and Tags

Fortunately, I can arrange the shortcuts into an order that makes sense to me.

I am currently in the process of emptying my email program of as many saved emails as possible.  I think this is what really sold me on using Evernote.  After watching The Secret Weapon videos that I've mentioned a couple of times, I used their method to work on my inbox.  I was shocked when I wound up with an empty email inbox!  I literally dropped my jaw open.  (It's not currently empty, but I now have a great method to use to get them processed.)

What do you think so far?  Do you think you can now use Evernote to help you go {Almost} Paperless?  I'd love to hear your thoughts on this!


{Almost} Paperless Organizing:  Intro to the Series

{Almost} Paperless Organizing:  Calendars

{Almost} Paperless Organizing:  Evernote

{Almost} Paperless Organizing:  Evernote, Part 2

{Almost} Paperless Organizing:  Evernote, Part 3

{Almost} Paperless Organizing:  Wunderlist

{Almost} Paperless Organizing:  AnyList

{Almost} Paperless Organizing:  Final Thoughts


Pin It!

Friday, March 28, 2014

{Almost} Paperless Organizing: Evernote, Part 2 (Post 4)

Welcome back!  Here is my continuing post about Evernote.  Today, I will get into the nitty-gritty of how to really make it sing and dance for you, and that involves using tags.


Main Categories of Tags
I have several main categories of tags:   tickler file, what, when, where, who, and miscellaneous tags.

Main Categories of Tags
You will notice that the note count (the first number) for these tags is 0 and there is another number following.  The second number tells how many subcategories there are for that main tag.  Most of these tags that you see have a . in front of it.  That serves two purposes:  for sorting and also to help me remember that no note should use that tag but a subcategorical tag.

.Tickler File tags
This is more of a work in progress.  I saw where someone else used tickler file tags and kinda of liked the idea, but I haven't really been able to implement it for my own purposes.  In case you don't know, a tickler file is one in which you place documents that you need for a particular day, month, or year.  We used to use tickler files at my former job as a customer service representative for a company who published financial newsletters.  We had a file box that contained 31 folders, one for each day of the month, as well as 12 other folders, one for every month of the year.  Every day, we looked in the file folder for that day of the month and see if anything needed to be done for that day.  On the first day of the month, we would look in the file folder for that new month and would take those documents and put them in the file folder for the particular days of that month.  It's a great system, but at this time I don't really have a use for it.  I may delete the .Month and .Year tags; for now, I will keep them just in case I decide I can use them.

.Holidays tags in the .Tickler File category


However, I did add in a set of tags for Holidays as you can see above.  The numbers refer to the month that the holiday falls in so that they sort in chronological order.  I don't yet have notes for every holiday, but at least I have the setup ready.  I already have 13 notes pertaining Easter; soon, I will look at those notes and see what activities I can do with my daughter.

.What tags
Several of these tags were recommended by other people (.Active Project, .Future Project, and .Inactive Project) but I have not found a practical use for myself at this time.

The .What tags
Even though I do have notes in Ideas and Reference, I am not convinced that I need those particular tags because I have notebooks that contain my ideas and reference material.

I do use the Read/Review tag for items that I would like to . . . well, read and review . . . at some time.

I know what you're thinking.  You're thinking, ok, so when are you going to tell me about tags that you DO use and that you DO find useful?  That's the next one coming up!

.When tags (my favorite)
If you are familiar with the Getting Things Done concept of time management (David Allen), you will recognize some of the tags found here.  I do recommend reading his book and other books that utilize his method.  It's very practical and provides a great method for thinking about tasks and projects.

Before I get into my .when tags, let me say that I think these are the most important tags to use to help you be more productive.  If a note has any kind of time significance to it, be sure to tag it with a .when tag.

Here are my when tags:

My .When tags
! Daily  (The ! is used to put this at the top) -- when I first started using tags, I used ! Daily to mark items that I wanted to look at every day.  I have since switched to using Wunderlist for my recurring tasks, so I do not need this one.  I know, I should delete it and quit talking about it. Moving on...

! Ongoing.  Umm, don't use anymore.  Nothing to see here.

! Weekly.  I do kind of use this.  Even though it says 3 notes, the only one is use is my cheat sheet for meal planning which reminds me where to find the recipes I will choose for the following week's meals.

1-Now   Ahhh!  Here we go.  1-Now are for items that are utmost in getting done NOW.  (Incidentally, writing blog posts is not marked 1-Now but serves as a great procrastinator.)  Last week, I had "Get stuff together for taxes" which I thankfully deleted once I delivered our stuff to our accountant.

1a-This Week  I use this for the recipes that I am making this week.  I needed a way to indicate that they are planned for somewhere between 1-Now and 2-Next and this works out fine.

2-Next  After I finish the 1-Now tasks or projects or if I'm looking for something else to do really soon, this is the tag I look under.


Here are some of my 2-Next notes.  Some refer to projects, some refer to random little things that I want or need to do soon, a couple of them are activities with Gracie which may not really be in the near future, but I do want to do.

2b-Waiting  This tag is for notes that need to be acted upon soon, but I'm waiting for someone else to do something so that I can go further with that item.  Three of these items are Honey-Do items.  One is a reminder to get people to get an insurance quote from State Farm and mention my name so that I can earn a $10 gift card.  (No strings attached.)

3-Soon.  These are for items that are a little down the road, perhaps within the next few months.  It may be that I know I do not have the time to do it now, but want to do it soon.

4-Later.  These are for items that I know I want to do, but will have to wait sometime.

5-Someday  These are for items that are some day in the future, but who knows when they can be done.  Want-to-but-don't-hold-your-breath.

The nice thing about these tags is that over time you can review the items with particular tags and change them to a different .when.  For example, in my Memphis Things to Do Notebook, I have 17 different things listed.  See the screenshot below:


Most of these are places that I will go to with Gracie.  We recently visited the Memphis Railroad and Trolley Museum with some friends and wanted to ride the downtown trolley, but the trolley line was closed down due to a fire incident.  I have marked those two items as 2-Next because I want to go there before any of the other places.   3-Soon are for places that I know I can visit soon without too much trouble. (By the way, in case you're wondering, the cemetery one is to scout out for a photoshoot location.)  Since spring has arrived and the weather is nicer, I can see where I can change some of the tags on these (the Zoo, for example).

6- . . . umm, where did it go?  Hmmm....obviously, I deleted it, but I don't remember what it said.

7-Weekend  I saw where someone used this to indicate tasks that were to be done on a weekend.  I haven't used this and I probably won't.

8-Did This.  To date, once I've completed something, I've deleted it from Evernote.  I'll keep it in case I want to keep notes for something I did.

That's enough for one post.  I'll continue talking about the .Where, .Who, and .Misc tags in the next post (or two).

Do you see how useful the tags are for time management and setting priorities?  What else can you think of to add?


{Almost} Paperless Organizing:  Intro to the Series

{Almost} Paperless Organizing:  Calendars

{Almost} Paperless Organizing:  Evernote

{Almost} Paperless Organizing:  Evernote, Part 2

{Almost} Paperless Organizing:  Evernote, Part 3

{Almost} Paperless Organizing:  Wunderlist

{Almost} Paperless Organizing:  AnyList

{Almost} Paperless Organizing:  Final Thoughts

Pin It!

Saturday, January 11, 2014

New Year's Goals and a Few Tips

Hello all!

I know I have been very negligent about blogging lately.  One of my New Year's Goals is to blog more often.  I'm shooting for once a week.

We had a great Christmas.  We enjoyed the day together opening presents and playing.  Gracie loved her skates as I knew she would.  Robert enjoyed his lamb dinner as I hoped he would.  I got a new lens for my camera (Nikon 40 mm 2.8 micro).  I haven't tried the macro part out yet, but I have done a family portrait session with it.  I've barely started editing photos, but so far, I'm very happy with the photos.

We spent the weekend after Christmas at my mom's.  Gracie always loves seeing her Mia, Papa, Uncle Steve, and Buster.  It was just a short two-night stay.  Then we went to Georgia to visit with Robert's brother and sister and families and had a great time there as well.  Gracie loved playing with her cousins.

Most of my New Year's Goals are monthly goals in various areas.  I think, mentally, it's easier to stick with something for a month and then continue than to try to do something for a year and get discouraged when it doesn't last.  At least that's what I'm hoping.  My overall goal for 2014 is to get more healthy by losing weight and increasing my overall physical fitness.  For January, my goal is to cut way down on sugar.  I am not drinking sodas and am drinking more water.  I haven't had much sweets (just some pieces of fudge because who can resist fudge at Christmastime?), and I do drink juice in the mornings to give me a little extra boost.

My goal is also to be more consistent with reading my Bible.  So far, I've not missed a day!  I do my reading at night because that's what suits my schedule best. (I wish I were a morning person, but I am not!)  Our church is reading the whole Bible collectively this month, and it's fun to participate in that (I am reading Mark and Leviticus this month in addition to my regular schedule; Robert is reading a few books, but I don't know which ones; and I signed Gracie up for the book of Jude which I will read to her.)

I have other goals which I can share later.  I wanted to share some tips with you.  Today was kind of a If You Give a Mouse a Cookie kind of day because one thing led to another.  (A bloggy friend of mine wrote a blog post about HER recent If You Give a Mouse a Cookie day entitled If You Give a Mom a New Chair.  I like her blog and recommend you take a look!)

First, I needed to change the tablecloth to a new one.  I get the vinyl ones to protect the tabletop, which is almost a waste of time because the tabletop has already lost some of its color from packing tape accidentally getting stuck and then being ripped off of it.  (Not happy about that - I would expect that stain would be more soaked-in than that.)  I like the vinyl tablecloths because they are easy to clean, but a problem I have with them is that they slide around too easily.  I figured out a solution a few months back:  use shelf liner (the rubbery stuff) in between the tabletop and the tablecloth.  It doesn't work perfectly because my husband and my daughter are not as careful about keeping the tablecloth straight as I am, but it does work better than not having it on.

Use Shelf Liner between the tabletop and tablecloth to keep the vinyl tablecloth from sliding around.

Here is the new vinyl tablecloth.  I prefer the ones that have a small print or are almost solid so it doesn't look so busy with all the stuff on it.

While I was at Dollar Tree today, I bought some large stretchy headbands to put on the (children's) game boxes so that they would not come apart and dump the contents all over the place.

Use large, stretchy headbands to keep game boxes closed.
 While putting the bands on the games, I took the opportunity to straighten up the games at the bottom of the closet.  (My not-for-little-kids games are at the top of the closet.)  This is our front closet.  Ever since putting in our Mini Mudroom*, I emptied out the closet of our coats (except that Robert put a few of his back in), and my plan is to put shelves in this closet to hold games, some toys (Legos, play-doh, Lincoln logs) and whatever else I can fit in there.

I just realized I never blogged about our Mini Mudroom.  I will put that on the docket to do soon.

I straightened up the children's games at the bottom of the closet.

I keep Gracie's portable DVD player that we mostly use for car trips.  I have the case hanging on a hanger.

Use a hanger to hang up your portable DVD player.

I also keep a few blankets in this closet, but, until today, they were kind of shoved in there with games on top, bottom, and in between.  Until I get my shelves put in, I decided to hang them on hangers to be more accessible.  The white blanket in front is one that I bought at Hudson's Salvage Store in Hattiesburg, MS, in 1991 or 1992 when I was a junior in college.  I bought it for only $3!  It has served as a doggy car blanket, picnic blanket, and a curl-up-on-the-couch-on-a-cold-day blanket!  It is a thick cotton blanket that is easily washable.
t
Hang blankets on hangers to make them more accessible.

A day or two ago, I read a great tip on Organizing Made Fun (or maybe watching her video when she appeared on a KTLA talk show, can't remember) where she hung her husband's hats on shower rings that are on a hanger.  Before today, my husband's caps were on an over-the-door coat/hat rack on the inside of the front closet door.

Hang ball caps on shower rings which are on a hanger.

Here is the inside of the front closet door with the empty hat rack.  The flowery bag is our library book bag, and the thing on the right is Gracie's tool belt.

We also have Gracie's bike helmet hung on this door.

My mom will be visiting us in a couple of weeks for Gracie's birthday.  Since the closet in the room where she sleeps (The Learning Room) is full of stuff, I moved the hat rack to that closet door for her to use to hang her clothes on.  There is also room enough in the front closet for her to hang more clothes if she needs to.

My very messy closet in the Learning Room.  It houses photography supplies, craft supplies, and who knows what else!
This is the door going into The Learning Room (formerly called The Room with the Big Window).  I did have just the hook on the right with various bags and aprons hanging on it.  The hook on the left also used to hang on the front closet door and was only used to hang Gracie's felt play scenes (which I never got out this year because I thought they were in the attic and only just realized a few days ago that they are in the messy closet shown above.) and a Spring wreath that my sister-in-law made me a year or two ago.


My husband just put up a Family sign (which can hold small photos) and Gracie's Baby Dedication certificate which pretty much completes the gallery wall in our living room.  I will post a photo on Instagram (Follow me here) later tonight.

Today pretty much caps off a fairly productive week around here despite my having a cold in the middle of it.  I was able to take down Christmas stuff and straighten up most of the rooms in the house, AND mop the kitchen floor!  Gracie's room is currently a disaster, so I think I will work with her on cleaning that up tonight.

Thank you for your patience in waiting for me to blog!  I hope to pop in at least once a week with projects and to continue various series that I started but never finished.

Pin It!

PrintFriendly