Showing posts with label Recipe Review. Show all posts

Saturday, June 7, 2014

Homemade Rice-a-Roni & Porcupine Roadkill

One of my favorite easy-to-make, no-brainer meals is Porcupine Roadkill.  Gross name, right?  The original dish was called Porcupine Balls because you formed meatballs and cooked them in Rice-a-Roni.  Over time, I got lazy and quit forming the meatballs and just cooked the meat as it was.  I amused myself by creating the name Porcupine Roadkill.  It's quite good.

Not too long ago, I found a pin for making homemade Rice-a-Roni packets.  I used the recipe to make my Porcupine Roadkill, and we all liked it well enough to keep it.  A few days later, I made about 8 or so packets using the ingredients that I had.

Rice -A Roni Packets -- My version

3/4 cup rice (instant brown rice)
1/4 cup broken angel hair pasta
1 Tablespoon minced onion
1/4 teaspoon garlic powder & Italian seasoning
3 cubes beef bouillon

This will just fit in a small snack-sized ziploc bag.

When I made this the first time, I only had chicken bouillon powder.  It tasted ok, but I think the beef bouillon will work better.  I left the cubes in the ziploc bags, because I was too lazy to peel the paper off and crush them.  I'm hoping that when I make it the next time, I won't even have to crush them, just let them dissolve.


Porcupine Roadkill
 
For Porcupine Roadkill, you will need 1 pound of hamburger meat and 1 packet of Homemade Rice-A-Roni plus about 1 cup of water (more or less - eyeball it).

Cook and drain the hamburger, chopping it into pieces.

Add the Rice-a-Roni ingredients (don't forget to peel the paper off the bouillon!) plus the water.

Bring to a boil and then reduce to simmer until the rice is cooked.

Source of Original Pin (with more info about different types of rice)

Pin It!

Friday, March 1, 2013

Cake on the Beach

I made a dessert that I haven't made on several years. It is SOOOOOO good!

I got it out of a Hungry Girl book from the library.

This recipe makes 3 servings which is just right for our family (or would be if Gracie would eat it).

Ingredients:
1/2 cup yellow cake mix
1/4 cup vanilla yogurt
1 T water

About 1/4 cup crushed pineapple
1 Jello sugar-free vanilla pudding (which is amazing by itself!)
1 T shredded coconut

Mix first three ingredients in a small bowl. Divide among three small bowls. I use Gracie's plastic baby bowls. Put the three bowls in the microwave and nuke for 45 seconds. Let sit for five minutes.

Poke some holes with a toothpick. Add a layer of crushed pineapple and then a layer of pudding. Put in the fridge for at least an hour.

When ready to serve, garnish with coconut.

Robert suggested to add marshmallows which made Gracie very happy. She tried eating just the marshmallows because the cake didn't pass the sight test. That's ok: more for me!


Pin It!

Wednesday, July 25, 2012

Slow Cooker Carolina Pulled Pork

When Gracie and I went to California for my nephew's graduation, my sister-in-law made this wonderful BBQ sandwich that she got from Pinterest. I immediately decided I would make it for Robert.


Ingredients:
  • 1 boneless pork shoulder blade roast (3 lb)
  • 1 tablespoon packed brown sugar
  • 1 tablespoon kosher (coarse) salt
  • 1 tablespoon pepper
  • 1 tablespoon paprika
  • 2 cups cider vinegar
  • 1 cup ketchup
  • 2 tablespoons Worcestershire sauce
  • 1 teaspoon red pepper sauce
  • 12 kaiser rolls, split  (We used regular bread.)
  • 1 pint (2 cups) coleslaw with sweet-and-sour dressing (from deli) (Optional)
  •  BBQ sauce
  • Notes:  My sister-in-law used a pork butt roast, so that's what I used, too.  I could only find a 6 pound roast, so I doubled the dry rub ingredients and increased the wet ingredients by 50% which made the crockpot almost completely full.

    Directions:
    1.  Trim the roast of fat.  This was a difficult procedure for me.  I think this was the first time I ever tried to handle pork, and it was not easy for me.  The fat really clings to the meat.  I didn't remove all of it, but most of it.
    2.  Mix the brown sugar, kosher salt, pepper, and paprika.  Rub all over the pork roast.
    3.  Place the pork roast into the crockpot.  Set it on low.
    4.  Mix together the cider vinegar, ketchup, Worcestershire sauce, and red pepper sauce.  Pour over the pork roast.
    5.  Cook on low for 8-9 hours.
    6.  Shred the pork (I highly recommend using a mixer with the paddle attachment.)
    7.  You can put the pork back into the crockpot and mix together.  I did not.  I served from the mixing bowl.
    8.  Optional:  Mix with BBQ sauce or add BBQ sauce to your sandwich.
    9.  Some people put coleslaw on their BBQ sandwiches.

    Robert really liked it as I hoped he would.  For some reason, I didn't like cooking this.  I didn't even try to eat any of it until the next day.  The smell just didn't agree with me at all.  (No, I am not pregnant!)  I was also still kind of grossed out from handling the raw meat.  However, when I tried it the next day, I really liked it.

    My husband used the pork broth to make rice and added shrimp and cajun sausage.  He liked it, though he said it's very rich.  I ate some of it but didn't care for it that much. To each his own.

    Source:
    Pin It!

    Wednesday, July 18, 2012

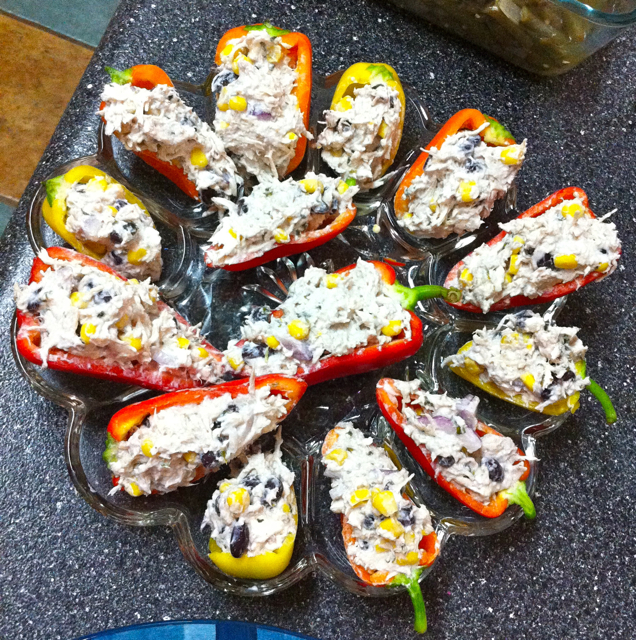
    Fiesta Chicken Stuffed Bell Peppers

    For Robert's birthday, I asked him if he wanted to go out to eat or did he want me to make him something special for his birthday supper.  He said to make him something special.  I asked him what did he have in mind, and he said, "Make me something exotic, spicy, and flavorful!"  I found two recipes that I wanted to try.  I can't remember the name of my first choice, but Walmart did not have one of the ingredients (Does that surprise you?  It shouldn't!), and I didn't feel like going to Kroger with a cranky toddler, so I made my second choice:  Fiesta Chicken Stuffed Bell Peppers

    I liked how I could put them in a deviled egg tray.


    Ingredients:
    • 3 cups shredded cooked chicken breasts
    • 1/2 cup sour cream
    • 1 cup (1 package) cream cheese
    • 1 cup black beans (drained)
    • 1 cup corn (drained)
    • 1/2 cup diced purple onion
    • juice of one lime
    • handful of cilantro, chopped (I used some cilantro in a tube.)
    • 2 garlic cloves (minced)
    • dash sea salt, pepper, and cumin

    Directions:

    1.  Cook the chicken.  I boil my chicken and use my mixer with the paddle attachment to shred it.  I think I cooked three chicken breasts which was more than enough for this recipe.
    2.  Squeeze lime juice over the chicken and sprinkle with sea salt, pepper, and cumin.
    3.  Mix the chicken, sour cream, and cream cheese.
    4.  Add the corn, beans, cilantro, garlic, and onion.  Stir until well combined.
    5.  Cut the bell peppers in half and remove the inner membranes and seeds.
    6.  Spoon the chicken mixture into the bell peppers.


    I wasn't overly crazy about this dish; however, Robert really liked it.  Good thing since it was for his birthday!


    Source:


    Pin It!

    Wednesday, July 11, 2012

    Jalapeno Cream Cheese Poppers

    Gracie and I went to California for my nephew's graduation. He had an open house party the day after, and my sister-in-law served these scrumptious Jalapeno Cream Cheese Poppers.

    They were SO good! Once we got back home, I made them for Robert and myself.
     
    Ingredients:

    1 tube regular Crescent Rolls
    ~1/4 cup diced Jalapenos
     6 oz. cream cheese at room temperature
    1 Tbs. sugar

    Note: I recommend getting the jalapenos already diced in a jar.  It saves time and you are less likely to get jalapeno juice on you which can be somewhat painful and itchy.  However if you cut them up yourself, use gloves.  If you get juice on your hands, place them in milk to relieve the itching and burning.

    Directions:

    1. Mix the jalapenos, cream cheese, and sugar.
    2. Unroll the crescent rolls. Press the seams together so that you wind up with two solid rectangles.
    3. Spread the jalapeno-cream cheese mixture onto the two crescent roll rectangles.
    4. Roll the long side of each crescent roll rectangle so that it forms a tube.
    5. Wrap in plastic wrap and place in the refrigerator for at least an hour.  This will make it easier to cut into pinwheels.
    6. Preheat oven to 375 degrees.
    7. Spray your cookie sheet with cooking spray.
    8. Cut the crescent roll tubes into 16 pinwheels each.
    9. Place the pinwheels on the cookie sheet.
    10. Bake for about 13 minutes.

    Source:

    Pin It!

    Monday, June 18, 2012

    Chicken and Rice Bake, revisited

    The original recipe that my SIL gave me.

    About six months ago, I blogged about this Chicken & Rice Bake recipe that's been a favorite for years.  I made it again yesterday, made just a couple of changes, and Robert declared it "perfect"!

    You can read the original recipe and previous subsequent changes from the link above.

    Here is my current "Perfect" version:

    Ingredients:
    1 can condensed cream of broccoli soup
    1 tub of Knorr's Homestyle Stock, chicken flavor (found in soup aisle, contains four little tubs)
    4-1/4 cups water
    1 cup brown rice
    1/2 cup white rice
    Heaping cupful of french fried onions + more to sprinkle in last step

    3 chicken breasts (can use more if you like, this is a good number for our family)
    paprika
    pepper

    Directions:
    1. Preheat oven to 375 degrees.
    2. In a 9x13 pan, mix together the first seven ingredients.
    3. Place chicken breasts on top.
    4. Sprinkle paprika and pepper on top of chicken (ok to overlap into rice mixture)
    5. Bake for one hour.
    6. Sprinkle as many fried onions as you like over the entire dish.  Bake for 3-5 minutes more or until onions are golden brown.
     This makes enough for my husband and me plus enough for his lunch and a snack-sized portion.  Gracie was asleep when we had supper and she has not really expressed interest in this meal before.  One day she will be a convert!


    Pin It!

    Friday, June 15, 2012

    Cream of Something Mix

    I have referred to this recipe in at least one other post in the past, but thought I would put it in a separate post to make it easy to find.

    Ingredients:


    1 cup non-fat dried milk
    3/4 cup cornstarch
    1/4 cup bouillon*
    4 Tablespoons freeze dried minced onions
    1 teaspoon dried basil
    1 teaspoon dried thyme
    1 teaspoon pepper
    For the equivalent of one can of condensed cream soup, mix 1/3 cup dry mix with 1-1/4 cup water. Cook until thick.
    *I couldn't find bouillon in the soup aisle of Walmart.  However, I looked in the Latino section and found some there.  This worked out better because it's a larger bottle of powdered bouillon instead of the cubes which would have to be crushed and ground up.  I used the chicken flavor since I've never heard of anybody needing "cream of beef soup."

     I like to use this for my Chicken and Rice Bake.  I will be posting a newly-revised version of that recipe next week.  Stay tuned!


    Pin It!

    Tuesday, May 22, 2012

    Chicken Lime Kabobs (or not)

    Ava, Gracie (age 15-1/2 months), and Mrs. Cowling, May 2011
    When I was a student at Hyles-Anderson College, I took a cooking class taught by Mrs. Frieda Cowling.  She is a wonderful teacher!  I also took How to Rear Children under her and Understanding Your Husband under her husband, Dr. Pete Cowling.

    Mrs. Cowling had her cooking students pair up and cook new recipes every week.  This recipe is probably my favorite one that we did.  I remember that it was the first time I'd ever had anything to do with jalapeno peppers.  Shooo-wheee!  They were hot, but SO GOOD!  It's a shame I had to wait until I was 32 years old to find out I liked hot stuff!

    For nearly 30 years, the Cowlings have traveled with the Songs of Praise summer tour group.  I've been blessed to have seen them last week as well as last year.  They usually do not go to the same church two years in a row, so it was a wonderful surprise for them to come both years.

    Chicken Lime Kabobs

    Ingredients:

    Marinade:
    1 large can of frozen orange juice (thawed)
    1-1/4 cup lime juice
    1 cup honey (or to taste) -- did not use
    4-5 jalapeno peppers, chopped
    10 garlic cloves, minced*
    3 T ground cumin
    2 T grated lime peel (did not use)
    1 t salt

    *I used about 1/2 tsp chopped garlic and about 2-3 T of garlic powder.  I can't really remember how much garlic powder I used, but that seems about right.  I didn't know I was almost out of garlic, so I had to improvise.

    2 pounds boneless chicken cut into 1-1/4" cubes
    4 medium peppers, mixture of red and green, cut into 1" pieces
    1 large red onion, cut into 1" pieces
    3 small zucchini, cut into 3/4" pieces (did not use)
    3 medium limes, cut into wedges

    Directions for Kabobs:

    1.  Mix marinade and separate into two ziplock bags, one for chicken and one for veggies.

    2.  Marinate 8 hours or overnight, turning occasionally.

    3.  Drain meat and veggies.  Reserve veggie marinade for basting.  Discard chicken marinade.  Thread chicken and veggies onto skewers.  If using wooden skewers, soak them in water for at 1/2 hour.

    4.  Grill uncovered over medium heat 4-5 minutes on each side.  Continue turning and basting 10-12 minutes.

    Directions for "or not":

    Preheat oven to 375 degrees F.  Dump veggies and marinade into a 9 x 13" baking dish.  Use a slotted spoon to get chicken and place on top of the veggies.  Discard chicken marinade.

    Cook in oven for ~45 minutes.


    I had planned on making this last Tuesday but was not feeling my best all week.  It was Friday before I prepped the dish.  Then, it was Sunday afternoon before I cooked it.  It turned out really good!  Robert said it was great the way it was, then said that he would like to try it with the addition of sweet and sour sauce.
    Pin It!

    Monday, April 2, 2012

    Garlic Chicken Puffs

    I found a couple of different pins on Pinterest of these Garlic Chicken Puffs.  I made them last week for an appetizer for the March Madness Games.  (Any excuse to make a new, yummy-looking recipe!)

    Tangent: As of Saturday night, March 24th, all four of my Final Four picks are in the running.  Robert's picks have all been eliminated.  I only watched about 10 minutes of a game between Ohio State and North Carolina.  Gracie had a blast copying me cheering "O-Hi-O!  O-Hi-O!"

    Ingredients:
    1/2 cup cooked chicken, shredded
    4 oz. cream cheese
    1 tsp garlic powder
    2 tubes of crescent rolls

    Directions:

    Mix together the chicken, cream cheese, and garlic powder.

    Open up the crescent rolls and cut each triangle in half.  Put a teaspoonful of chicken mix in the triangle and pull the corners up to make a little bag.  I made mine so that all of the chicken was enclosed, but the picture shows where the chicken mix is spilling out.

    The recipe said that this will be enough for two tubes of crescent rolls, but I guess I put too much because one tube took care of most of the chicken.


    Note:  To prepare the chicken, I baked two chicken breasts at 350 for 35 minutes.  I then put them in my Kitchen Aid mixer to shred them using the paddle attachment.  This made 1-1/2 cups of chicken.

    Robert declared it a Keeper Recipe and two thumbs up. I thought they were good, too.  Gracie wouldn't even try it.

    I made them again a couple of days later.  Robert had the idea of inserting a cheddar cheese cube in each puff, so I tried that.  I cut each cube in half and wrapped the chicken-cheese mixture around it before putting in the crescent rolls.  This turned out so good!!  I liked it much better than the original recipe.  The only problem is that, apparently, I didn't seal the seams up completely because the cheddar cheese leaked out on some of them.  They were still quite good!


    Original Source:
    Source: carddit.com via Ava on Pinterest
    Pin It!

    Thursday, March 22, 2012

    Corndog Muffins

    I've seen a couple of different pins on Pinterest for these Corndog Muffins.  I could only find one of them quickly when I was ready to make them, so I used the one that's shown at the bottom of this post.

    Before cooking
    Ingredients:
    Jiffy cornbread mix (plus whatever it takes to make the batter)
    hotdogs (Hebrew National is our favorite brand)
    cheese
    shortening to grease muffin tins
    chili (optional but recommended)

    Directions:
    1.  Mix up the Jiffy cornbread batter.
    2.  Cut up the hotdogs.  I cut them into "coins" rather than chunks for my daughter.
    3.  Grease the muffin tins.
    4.  Put about a spoonful or so of batter in the muffin wells.  Put in some hotdogs (I put 5 "coins."), add some cheese (I did not add enough), and top with more batter.
    5.  Bake according to Jiffy directions.

    I only had one box of Jiffy so I was only able to make 8 muffins.  We also had some hotdogs left over in the package.  I put them in a baking dish and baked them along with the muffins.  They came out perfectly cooked.

    I wasn't sure if the cornbread muffins would be rather dry, so I heated up some Hormel chili with beans to eat on the muffins and/or hot dogs.  They definitely added to the meal.

    Gracie ate one of the muffins at supper and enjoyed it.  When I gave her the two leftover muffins for lunch, she had her Grandma help her pick out the hotdogs and she ate those, leaving the cornbread.

    Ready to eat!

    This was an ok recipe.  I would not have wanted them plain, so I'm glad I added the chili.  I couldn't really detect the cheese, so I did not put enough.  Since Gracie picked out the hot dogs, I'm guessing she's not a big fan of the cornbread, either.  Maybe when she is older, she will like them better.  They would make a great make-a-bunch-ahead-and-freeze lunch for her.


    Original Source:
    Pin It!

    Tuesday, March 20, 2012

    Cooking Bacon in the Oven

    I found this idea on Pinterest. I liked the idea of cooking so much bacon at once with less cleanup. I also thought it would be great to cook up a bunch of bacon at once in the evening to have ready for breakfast over the next few days.

    I cooked up two baking sheets' worth of bacon (16 slices). The first batch I cooked for 20 minutes at 350. They didn't look done enough, so, for the second batch, I cooked them for 22 minutes at 350. I put them in a container and put them in the fridge.

    Just about every day this week, I've microwaved the bacon for breakfast. I put two or three (usually three) slices inside a folded-up paper towel on a microwave plate and set the microwave for 1 minute. It comes out perfectly and is oh-so-good!


    Original source:
    Pin It!

    Monday, March 12, 2012

    Firecracker Burgers

    A friend of mine shared this recipe on Facebook, and I tried it out the very next day!  Unfortunately, I did not take any pictures.


    Ingredients:
    1 lb. hamburger meat
    1/4 cup salsa (I used the nasty Great Value salsa that I bought to try, didn't like it, and told Robert he could have it.)
    2 tsp Taco seasoning (I used 1 tablespoon of my homemade taco seasoning.)
    2 tsp garlic salt (I used 1 tsp of garlic powder and 1/4 tsp of salt.)

    Mix well and cook.  Be careful because the meat will turn dark on the inside before it is actually done.

    Top with pepperjack cheese and guacomole (optional).

    Robert and I both really liked these burgers!
    Pin It!

    Thursday, March 8, 2012

    Pistachio Dessert

    Pistachio Dessert on dessert table at Old Fashioned Sunday
    My sister-in-law Kris gave me this recipe years ago. It's really good! Of course, anything with pistachios, and especially pistachio pudding, is going to be delicious!


    Ingredients:

    1 stick oleo* (That's the old name for margarine, but I use butter.)
    1 cup flour*
    2 Tbs sugar*
    1/2 cup nuts* (I chopped up pecans.)
    8 ounces cream cheese, softened
    large carton of Cool Whip (16 oz.), thawed and divided
    2/3 cup powdered sugar
    2 small packages instant pistachio pudding
    2-1/2 cups milk
    Extra nuts for sprinkling


    Directions:

    1. Before starting, make sure the oleo/margarine/butter, cream cheese, and Cool Whip are thawed or soft.
    2.  Preheat oven to 350 degrees.

    3.  Bottom layer:
    Mix 1 stick oleo/margarine/butter, 1 cup flour, 2 Tbs sugar, and 1/2 cup nuts.  Put on bottom of your 9x13 pan. (*I may have had it too thick, but it didn't cover the whole bottom, so I mixed up some more to cover the whole bottom of the dish.)  Bake 10 minutes.  Take out and let cool.

    4.  Next layer:
    Mix 8 ounces cream cheese, half of the large carton of Cool Whip, and 2/3 cup powdered sugar.  Layer on top of the crust.

    5.  Next layer:
    Mix 2 small packages of instant pistachio pudding and 2-1/2 cups milk.  Put in fridge to make pudding.  Layer on top of the cream cheese-Cool Whip layer.

    6.  Final layer:
    Put the remaining Cool Whip on top and sprinkle with nuts.  Refrigerate for at least four hours before serving.

    The finished dessert


    Came home with half of it.  Not bad considering all of the other yummy desserts that were there!
    Pin It!

    Tuesday, March 6, 2012

    Crispy Onion Chicken

    I got this recipe from the February-March 2011 issue of Taste of Home.

    Ingredients:

    1/2 cup butter, melted
    1 Tbs Worcestershire sauce
    1 tsp ground mustard
    1/2 tsp garlic salt (I used garlic powder and sprinkled some salt.)
    1/4 tsp pepper
    1 can (6 ounces) cheddar or original french-fried onions, crushed (I used a 6-ounce bag of original french-friend onions.)
    4 boneless, skinless chicken breast halves

    Directions:
    1.  Preheat oven to 350 degrees.  Grease a 9-inch square baking pan.
    2.  In a shallow bowl, combine the butter, Worcestershire sauce, mustard, garlic salt, and pepper. (I microwaved the butter in the shallow bowl and added the other ingredients to it.)  In another shallow bowl, add 1/2 cup fried onions.  Dip chicken in the butter mixture, then coat with onions.
    3.  Place the chicken in the greased baking dish.  Top with the remaining onions; drizzle with any remaining butter mixture.
    4.  Bake, uncovered, at 350 degrees for 30-35 minutes or until chicken juices run clear.

    We really enjoyed this chicken.  I think I may have cooked it a little longer than the 35 minutes (but not by much).  The chicken, even the thick breasts, were done perfectly while the onions were somewhat overdone, but not burnt.
    Pin It!

    Thursday, March 1, 2012

    White Bean and Chicken Chili

    This is one of our favorite recipes for the crockpot.  The original recipe came from a magazine, but I do not remember which one.  I have since changed it a little.

    I served this at Gracie's first birthday party last year, and everyone really liked it.


    Ingredients:

    3 15-ounce cans white beans (Northern beans), rinsed and drained
    4 cups chicken broth
    1 Tbs vegetable oil
    2 chicken breasts
    salt and pepper

    2 onions chopped
    4 garlic cloves, chopped
    2 4-ounce cans green chilies, drained
    1 Tbs ground cumin
    1 cup water

    1.  Place beans and broth in crockpot.  Cook on high 2 hours.
    2.  In the meantime, chop your onions and garlic to be used in step 4.
    3.  Warm oil in skillet over medium-high heat.  Sprinkle chicken with salt and pepper.  Cook until brown, about four minutes.  Turn over and cook two minutes.  Transfer to a plate.
    4.  Add onions and garlic to skillet.  Cook about 5 minutes.
    5.  Add onions, garlic, chilies, 1 cup water, and cumin to the crockpot.  Stir.
    6.  Add chicken to the crockpot.  Cook on low for six hours.
    7.  Take chicken out of the crockpot and shred. (My favorite tip is to put it in my kitchen aid mixer with the paddle attachment and run it for about 15 seconds or so.)
    8.  Add chicken back to the crockpot and stir.  Ready to serve!

    The original recipe called for less white beans and more chicken, but we agreed that we'd prefer more white beans and less chicken, so I changed the ratio.

    The only thing I don't like about the recipe is that you have a few steps in the middle of cooking it, so you have to be home at the appropriate time.  However, it is a great recipe and worth the inconvenience.
    Pin It!

    Tuesday, February 28, 2012

    French Dip Crescents


    Ever since I saw the French Dip Crescents on Pinterest last week, I've been dying to try them.  I even made a special trip to Walmart to get the ingredients.  Unfortunately (but typical), Walmart did not have one of the ingredients I needed, the Au Jus gravy mix, and then I forgot to get the horseradish.  I decided to "make do" with what I had, and we really liked the results!

    French Dip Crescents Ingredients:
    ~8 oz. deli sliced roast beef (I used Hillshire Farms.)
    sliced cheese (I used Swiss, but other recipes call for Provolone.)
    one tube of 8 crescent rolls (I got the grand crescents which are 50% bigger than the regular.)
    A-1 sauce

    Au Jus Ingredients:
    carrots (I used 4 "chips")
    thyme (did not measure)
    onion powder (did not measure)
    butter (did not measure)
    enough water to mostly fill a small pot
    one tub of Knorr's homestyle stock, beef flavor

    Directions:

    Begin the au jus about an hour before you want to serve.

    1.  Put carrots, thyme, and onion powder in a small pot.  Add butter.  Melt the butter and mix with the carrots and seasonings.
    2.  Add water and heat.
    3.  Add Knorr's homestyle beef stock.  Mix.
    4.  Heat to almost boiling.  Simmer until crescents are done.

    5.  Preheat oven to 350 degrees F.
    6.  Unwrap a crescent roll at a time.  Stretch out the dough a little so that the big end looks a little more like a rectangle.
    7.  Drip A-1 onto the crescent roll.
    8.  Divide the roast beef into 8 roughly equal portions.  Put 1/8 onto the crescent roll.
    9.  Top with cheese (I put 1/4 slice of cheese on each one. You can add more if you like.)
    10.  Roll up and put on ungreased baking sheet.  Repeat for remaining crescent rolls.
    11.  Bake for about 15 minutes or until the crescents are golden brown.

    12.  Put au jus into as many serving dishes as you need.


    My husband was out Soulwinning this morning when I made this.  He brought home hamburgers from a new burger place, not knowing that I'd prepared lunch.  I said I still wanted to try them, and he said he wanted to try them as well.  We both loved them!  Definitely a keeper recipe!

    Original Sources:


    Pin It!

    Thursday, February 23, 2012

    Cheesy Chili Hashbrown Bake

    I got this recipe from Southern Living magazine.  I think I must have torn it out of my mom's magazine, because I do not subscribe to it.


    Ingredients:

    1-1/2 lb. lean ground beef or turkey
    1 (15.5 oz.) can original sloppy joe sauce
    1 (15-oz.) can chili with beans (I use Hormel's.)
    ~4 cups from a 30-ounce package of frozen country-style shredded hashbrowns
    (I used potatoes O'Brien which have onions and peppers added.)
    2 cups (8 ounces) shredded cheddar cheese

    Preheat oven to 425 degrees.

    Brown ground beef in a large skillet over medium-high heat, stirring often, 7 to 10 minutes, or until meat crumbles and is no longer pink.

    In the meantime, lightly grease your baking dish(es).  They recommended using 8 10-ounce ramekins, but said that you can use a 9 x 13" baking dish.  I used the 9 x 13" dish.

    They did not say to drain the ground beef, but I did.  Add sloppy joe sauce and the chili to the ground beef, and heat through.

    Spoon chili mixture into your baking dish(es).  Top with frozen hashbrowns.  (I only covered half with hashbrowns since my husband is currently doing Atkins.)  Cover with aluminum foil.

    Bake covered at 425 degrees for 30 minutes.  Uncover and bake 10 more minutes or until browned and crisp.  Sprinkle with cheese (I used only about half of the amount they said to use.), and bake 5 more minutes or until cheese is melted.

    We loved this recipe!  Robert gave it a two thumbs up even with his portion not having any hashbrowns.  Gracie tried it -- but only because her daddy bribed her with "doe-noe" (soda).

    I can't think of anything I would change about it (I definitely like using the potatoes O'Brien.).  This is such a simple dish that it would be easy to keep the makings on hand.

    I meant to take a picture of the dish, but I forgot.  It's not so pretty now!
    Pin It!

    Wednesday, February 22, 2012

    Sharing Valentines

    My daughter and I visited the schoolchildren at our church's Christian school this past Thursday and gave them some Valentine treats.

     I found the idea for this on Pinterest (of course).  They are super easy to make.  Just combine red velvet cake mix, 2 eggs, and 1/2 cup of softened butter.  Roll into balls (messy!), and put on a baking sheet.  Bake at 350 for 8-10 minutes.  Spread cream cheese frosting in the middle of two cookies and roll in sprinkles.  The original recipe did not say to grease the baking sheet, so I didn't.  However, I do think it would be better to since the cookies stuck and left part of the middle on the sheet.

    These cookies are really good!  My husband liked it, my daughter liked it, and I liked it.  I haven't heard from the schoolchildren, but I'm sure they liked them as well.

    I also made butterfly Valentines for them (see the Pinterest picture below).  Unfortunately, I did not get a picture of them.  I wanted to get a picture of Gracie handing them out, but I couldn't get a good angle on her and she was being somewhat uncooperative having one of her rare shy moments.  The original pin calls for suckers and googly eyes.  I went to Walmart the day after Valentine's Day and couldn't find ANY suckers in the Valentine area.  I was too lazy to go over to the candy aisle in the grocery department.  However, I did see some cute pencils and decided to use them instead.  I printed off 11 sheets for 22 butterflies and thought that I would get them cut out in about 20 minutes.  Boy, was I wrong!  It took about 45 minutes to cut those things out!  Granted some of that (about 5 minutes) was spent in getting Gracie up and settling her with some milk.  She wanted me to sit with her, so I took my cutting over to where she was and she climbed over me part of the time, but still, I was surprised it took so long!  I tried cutting the slits to push the pencil through, but decided to simply tape the butterfly to each pencil instead.  It was much quicker.


    Pin It!

    Tuesday, February 21, 2012

    Crunchy Chicken Tenders

    Every once in a while, I'll get a set of recipe cards in the mail from a company that wants you to join their recipe card club.  I usually pull out the sample cards of recipes that sound good and throw the rest away.  I'm not sure what company this comes from, but in teeny tiny writing it says "c. International Masters Publishers AB. Customer Service 877-627-2853  mygreatrecipes.com"  (I don't know a thing about that company; I haven't even visited that website.)


    Ingredients:

    Chicken:
    2/3 cup mayonnaise
    2 tsp. onion flakes
    2 tsp. dry mustard  (I forgot that I had thrown out my expired container, so I squirted prepared mustard into the mixture.)
    1 cup butter cracker crumbs (about 23 round crackers)
    2 Tbs. sesame seeds
    14 oz. chicken tenders, patted dry (The only package I could get was 18 oz., so I increased the amounts of these ingredients by approximately 25%.)

    Dip:
    1/2 cup mayonnaise
    1/2 cup sour cream
    1/4 cup chopped onion
    1 Tbs. chopped fresh parsley  (I used dried parsley.)
    3/4 tsp. seasoned salt  (I didn't have any, so I used either a cajun blend or chipotle blend, can't remember which.)
    1/4 teaspoon garlic powder

    Directions:

    Preheat oven to 425 degrees.  Grease a baking sheet. (I sprayed Pam.)

    Combine 2/3 cup mayonnaise, the onion flakes, and dry mustard (or in my case, prepared mustard) in a shallow bowl and mix well.

    Combine the cracker crumbs and sesame seeds in another shallow bowl and mix well.

    Dip the chicken tenders in the mayonnaise mixture, then coat with the cracker crumb mixture.

    Arrange the chicken tenders on the prepared baking sheet.  Bake, turning once halfway through baking, until the chicken is cooked through and the juices run clear when pierced with a knife, 12-15 minutes.

    Meanwhile, combine the dip ingredients in a small bowl.  Mix well.  Serve with the chicken tenders.

    This was good.  Robert gave it two thumbs up.  Gracie would not try it.  She's soooo picky!  The only thing I didn't like about it is that it wasn't really that crunchy.  I think there may be some sort of technique error that I don't know about.  Also, the dip (for me) was too much dip.  I would cut it by at least a third.  I also would probably use onion powder instead of chopped onion because when I dipped my chicken, I never did pick up any real onion.
    Pin It!

    Thursday, February 16, 2012

    Crockpot Stew

    I got this recipe from Taste of Home.  I used to have a subscription several years ago (twice at two different times).  I saved most of my magazines and have been slowly going through ripping out the ones I want to try.  Piece of advice:  If you are teaching your young child not to rip up paper, do not rip out recipes or other articles in her presence.  Gracie tells me "No no no no no!"


    Ingredients:

    1 lb. beef stew meat
    2 medium potatoes, peeled and cubed
    1 can (14-1/2 oz.) beef broth
    1 can (11-1/2 oz.) V-8 juice (I used the 5.5 oz. cans of V-8.  Never noticed there was a size specification until after I made the stew.)
    2 celery ribs, chopped
    2 medium sweet onion, chopped
    3 bay leaves
    1/2 tsp. salt
    1/2 tsp. dried thyme
    1/2 tsp. chili powder
    1/4 tsp. pepper

    2 Tbs. cornstarch
    1 Tbs. cold water
    1/2 cup frozen corn
    1/2 cup frozen peas


    Directions:

    In a 3-quart slow cooker, combine the first 12 ingredients (from beef stew meat down to pepper).  Cover and cook on low for 7-8 hours or until meat is tender.  Discard bay leaves.

    In a small bowl, combine the cornstarch and water until smooth; stir into stew.  Add corn and peas.  Cover and cook on high for 30 minutes or until thickened.

    This is really good stew.  I love anything that can just be thrown together in a crockpot.  I'm not a fan of peas (English peas), but I will eat them in soups and stews like this.
    Pin It!

    PrintFriendly