Wednesday, November 30, 2011

Book Review: The Christmas Singing by Cindy Woodsmall


The Christmas Singing is a beautiful novella about love lost, love regained, and reconciliation.

Mattie is an Amish young woman with a delightful personality who is a highly-skilled and gifted cake decorator in Ohio.  In the three years she has lived there, she has built a highly successful business due to her hard work and creative talents.  Her decision to move to Ohio from her native Pennsylvania was due to a wrong conclusion drawn from seeing her fiance hug another woman.

Mattie's former fiance', Gideon, is a carpenter with a secret that he chose to hide from Mattie in order to protect her from going through a difficult time.  He let Mattie think wrongly of him, a decision that caused unnecessary suffering -- not just for them but for others as well.

When Mattie's shop burns down, she is forced to go back to Pennsylvania where she is around Gideon for the first time in years.  There is obvious and understandable friction between the two.  Both of them learn a few things about themselves and each other in the course of the story which results in a beautiful reconciliation.

While reading the book, I wondered if this was actually the second of a series.  It seemed like the author was giving a brief synopsis of how another couple in the book discovered love for each other.  I looked it up, and sure enough, this is book 2.  The previous book is called The Sound of Sleigh Bells and will be on my To Read list very soon!

Cindy Woodsmall is one of my favorite Amish Christian Fiction authors.  I really enjoyed reading this book.  I began reading it while on a trip to South Mississippi to visit family for Thanksgiving.  When we pulled up into my mom's driveway, I had about 5 pages remaining in the book.  It was rather hard to wait a couple of hours before I could finish the book.  Even though I "knew" that she and Gideon would reconcile, it still felt like a cliffhanger wondering if they would or if she would marry another man, Sol, whom she had been seeing for the last couple of years.  Speaking of which, I think that Cindy Woodsmall should write a book about Sol and another young lady who rubs him the wrong way.  I just know they should end up together!

I really enjoyed this book, and I highly recommend to it you.

Reviews on Blogging for Books can be reviewed and ranked by others.  I would love it if you would visit my review on the Blogging for Books site and rank my review.  Upon ranking my review, you will be entered in a drawing to win your own copy of this book!  Don't worry, you won't hurt my feelings if you give me a bad review.  I'd rather have an honest bad review than a dishonest good review.  "Faithful are the wounds of a friend: but the kisses of an enemy deceitful." (Proverbs 27:6)


Here is the link for my review.

FTC Disclaimer:  I received this book for free from WaterBrook Multnomah Publishing Group for this review.”  I was not required to provide a positive review.  All opinions expressed are my own.
Pin It!

Tuesday, November 29, 2011

Gummy Fruit Snacks

I found this yummy-looking snack on Pinterest and thought it would be a great, healthy alternative to the commercial fruit snacks.

Ingredients:
 1 cup mixed berries (I used frozen mixed berries.)
1/4 cup water
1/2 cup applesauce
1/2 cup fruit juice (I used Cran-Grape which we already had in the fridge.)
2 envelopes gelatin (1 envelope = 2-1/2 tsp.)

1.  In a small saucepan over medium heat, combine the berries and the water.  Bring to a boil and cook until berries are soft (about 5 minutes).

2.  Using your favorite method, puree the berries until smooth.  Return to the pot.  Add applesauce and bring back to a boil.  Remove from heat, cover, and set aside.

3.  In a large bowl, sprinkle gelatin over fruit juice and let stand for one minute.  Add the hot fruit mixture and stir until gelatin completely dissolves, 3-5 minutes.

4.  Pour into 8x8" glass or ceramic baking dish (or into molds).  Refrigerate until firm, at least 3 hours.  Cut into blocks or shapes.


Gracie wouldn't even try it.  She normally has three tests to determine if she will eat something new.  First is the look test.  "Does it LOOK like something good?"  Then is the touch taste.  "Does it feel funny?"  Finally, is the lick taste.  "OK, one lick and I'll see if I like it."  It didn't even pass the look test.  She likes the commercial fruit snacks (I like Welch's), so I don't know what the deal was with this.  I'll try again in a few months.  I do think she will like them if she would only try them!  Hmmmm......I probably should get Green Eggs and Ham to read to her, too.

Original Source:
Pin It!

Monday, November 28, 2011

Let Us Go! Let Us Go! Let Us Go!

 Let us Go! Let us Go! Let us Go!

Oh, the world outside is dying,
And the people are quietly sighing.
They all have tales of woe.
Let us Go! Let us Go! Let us Go!

It doesn't show signs of stopping.
They're all out going shopping,
Following our Adversary and Foe.
Let us Go! Let us Go! Let us Go!

They need to hear the Good News,
Come to church, and fill the pews,
Know that Jesus loves them so.
Let us Go! Let us Go! Let us Go!

So grab a tract with Bible verses.
Put them in your pocket and your purses.
Forget about that TV show!
Let us Go! Let us Go! Let us Go!

Find a soul on their way to Hell
On the streets or in the jail;
Salvation they need to know.
Let us Go! Let us Go! Let us Go!

Our Saviour said, "Go ye therefore,"
So we must go knock on the door.
"Well done," we'll hear, I know.
Let us Go! Let us Go! Let us Go!


By Ava Gunn Kinsey, November 2000
Pin It!

Friday, November 25, 2011

Cream of Wheat Muffins

I am not a morning person.  At all.  I cannot even think about doing anything resembling cooking until I've been up for a couple of hours or four or five.  So, I am a big fan of quick and easy, painless and no-thought breakfasts.

When I was a little girl, my mom used to fix cream of wheat for me sometimes.  I don't know what she did to it, but she made it taste so good!  I have never been able to replicate it.  (I guess I should ask, huh?)  I found this recipe for Cream of Wheat Muffins on Pinterest and put it on my Menu Plan to make.

Ingredients:
1 cup flour
1 cup dry cream of wheat (I used the whole grain version.)
1/2 cup sugar
3/4 cup milk
1/4 cup vegetable or canola oil (I didn't have enough vegetable oil so I made up the difference with olive oil.)
1 egg
1 tsp vanilla
1 Tbs baking powder
1/2 tsp salt

Combine all ingredients and stir together until moistened.  Pour batter into a greased or paper-lined muffin tin.  Bake at 400 for 15-18 minutes.

These muffins were OK.  I prefered to eat them with butter as they were rather bland to me.  Gracie liked them.  They are very crumbly and make a horrible mess when little ones eat them.  Robert liked them better when he found out they were made with cream of wheat and so are rather healthy.

Original Source:
Pin It!

Thursday, November 24, 2011

Southwestern Corn Chowder

I'm not really sure exactly when and where I got this recipe.  It's printed on a Walmart advertisement flyer for Knorr Homestyle Stock.


Southwestern Corn Chowder

Ingredients:

2 Tbs I Can't Believe It's Not Butter! Spread (I used butter.)
3 large all-purpose potatoes, peeled and diced (about 1 pound)
1 cup finely chopped onion
1 tub Knorr Homestyle Stock - Chicken
3 cups water
1 can (14-3/4 oz.) creamed corn
1 Tbs lime juice
2 Tbs finely chopped fresh cilantro (optional - did not use. I generally do not buy fresh herbs as I don't like to waste the leftovers.)

1.  Melt spread (butter) in a 4-quart saucepan over medium heat and cook potatoes with onion, stirring occasionally, until potatoes start to stick and onion is tender, about five minutes.

2.  Stir in Knorr Homestyle Stock until stock is melted.  Stir in water, scraping up any brown bits from bottom of saucepan.  Stir in corn and bring to a boil over high heat.

3.  Reduce heat to low and simmer, stirring occasionally, 15 minutes or until potatoes are tender.  Lightly mash potatoes with fork or potato masher until creamy.  Stir in remaining ingredients.

I used butter instead of the spread.  I like to use butter sticks (unsalted) for butter that has to be measured out, and I use Smart Balance butter spread (my husband's preference) for butter to be spread on toast and things like that.

It took longer than 15 minutes to cook the potatoes enough to mash easily.

Robert liked this better than I did.  I didn't dislike it, but it wasn't my favorite thing, either.  I had a bowl and that was enough for me.  Robert declared it a keeper, so it goes in the Keeper Recipe Binder.
Pin It!

Tuesday, November 22, 2011

Crockpot Chicken Taco Chili

I'm a sucker for crockpot recipes.  Anything that can be thrown together and cooked without supervision is a winner in my book.  I saw this recipe on Pinterest and was immediately intrigued.  A few weeks ago, I started planning to do things that I had pinned on Pinterest and this was the first crockpot recipe that I tried.  Full Disclosure:  I was not the first pinner of this recipe, but I couldn't find the original pin, so I googled for the recipe and repinned it myself.


Crockpot Chicken Taco Chili

Ingredients:

1 onion, chopped
1 16-oz can black beans
1 16-oz can kidney beans
1 8-oz can tomato sauce
10 oz package frozen corn kernels
1 14-1/2 oz cans diced tomatoes with chilies (I used regular Rotel.)
1 packet taco seasoning
1 Tbs cumin
1 Tbs chili powder
chili peppers, chopped (optional)  (I didn't use.)
24 oz. (3) boneless, skinless chicken breasts
chopped fresh cilantro
sour cream (optional)
cheese (optional)
Tortillas (optional)

Combine first ten ingredients.  Place chicken on top and cover.  Cook on low for 10 hours or on high for 6 hours.  Half hour before serving, remove chicken and shred.*  Return chicken to crockpot and stir in.  Top with fresh cilantro.  Add sour cream and cheese.  Serve on tortillas.

*Here's a handy-dandy tip that I tried and loved:  Put the cooked chicken in your stand-alone mixer (such as Kitchen Aid which is what I have, a gift from my grandma).  Use the paddle attachment and turn on to setting 1 or 2 for less than 30 seconds.  It will do a beautiful job of shredding your chicken!  SO much easier than wrestling with knives, forks, and other kitchen implements.

I served the chicken taco chili (say that three times fast!) by itself with cheese and sour cream on the side.  My husband had the great idea of putting them on tortillas.  The next day, he even put a tortilla on the griddle part of our stuff and put the chicken taco chili on top.  This crisped up the tortilla and warmed up the chicken taco chili.  We liked it this way really well.

We both declared this a Keeper Recipe!

Original Source:
Pin It!

Sunday, November 20, 2011

Blogger Tip: Fixing Truncated Posts in Google Reader

Full Disclosure:  I'm disguising this pet peeve of mine as a blogger tip.

I use Google Reader to read all of the blogs I follow (UPDATE: I no longer use Google Reader.  Here is why.).  It's a fantastic time-saver.  It allows me to go from one blog post to another from all of the blogs quite easily.  Most of the blogs have their settings set up so that I can read the entire blog post and view all of the images on the blog post.  Others, however, have their settings set up (most of the time, unknowingly, I think) so that I see only the first part of their blog post and NONE of the images.  In order to see the entire blog post, I have to go directly to their site, usually after "starring" it to look at later.  This adds unnecessary time to blog reading.  I have contacted a few of the blog owners and kindly let them know of the problem AND the solution (for those who use Blogger as their host).  I have no idea what to do for WordPress people.  (I guess I could google it!  Here's a possible solution.)

For Blogger users, you need to do the following:

While in your Dashboard, click on Settings.  Then, click on Site Feed.
At the top where it says "Allow Blog Feeds," make sure the drop-down menu says "Full."

This will take care of the problem, and your readers who use Google Reader (or other RSS Feeds) will be much happier.
Pin It!

Toddler Fun: Felt Fall Scene

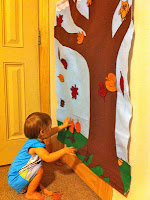
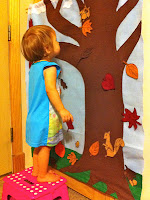
Gracie loves her new Felt Fall Scene!
If you've been a reader of my blog for the last couple of weeks, you'll know that I've really been into getting great ideas from Pinterest.  One great idea I've seen is that of a felt Christmas tree which your child can decorate with felt decorations.  I will be making that one soon, probably the week after Thanksgiving.  The other day, Gracie and I went to Storytime at the old Davis-Kidd Bookstore (THE BEST Storytime in Memphis!).  Mrs. Marjorie gave the children a paper with a fallish tree on it and some foam stickers (pumpkin and two leaves).  Gracie LOVED sticking them on the paper, on herself, on me, on the wall.......  It wasn't long before before the stickers lost their sticky, and that got me to thinking.... (sometimes that's a bad thing, but in this case, I got a good idea of something to make for Gracie to play with).  This is the result:  A fall scene made of felt with felt accessories.  It took me roughly 5-6 hours to do the whole thing (not counting shopping for the materials!).  As you can see, it's rather large, so a smaller one would not take as long.  Plus, I was pretty much winging the process and that always takes longer than having a plan you can follow.

Materials Used
  • 1 yard of sky blue felt (for the background)
  • 1 yard of dark brown felt (for the tree and some of the leaves)
  • 4 squares of green-like-grass felt (for the grass)
I had a horrible time trying to decide which shade of green to use or whether I should use a tan color since grass dies in our part of the country.  I decided to use regular medium green so that I can reuse this scene in the Spring!
  • white thread
  • dark brown thread
  • green thread
  • white felt (for the clouds)
  • orange felt (for the pumpkins)
  • dark yellow felt (for some of the leaves)
  • dark red felt (for some of the leaves)
  • tan felt (for the squirrel, acorns, and owl)
  • 1 one-yard-long 1/4" diameter dowel
  • 3 one-foot-long dowels (smaller than 1/4") -- can definitely use another yard-long-one like the one above
  • scissors
  • sewing machine
  • black sharpie marker for drawing
  • length of cord (I used clothesline from Home Depot)
  • an over-the-door hook (borrowed from the bathroom)

Here's How I Made It


 First, I cut the blue felt to the size that I wanted it to be.  I guestimated by holding it in front of a door.  I wanted it to be tall enough for it to last several years.  It was already one yard wide and I wanted it somewhat proportional to a portrait style size.

Then, I laid the dark brown felt on top of the blue felt and I cut out "what wasn't a tree" free-handed. (Karate Kid reference, in case you didn't catch that.)


 I only had one small piece of small white felt.  I wish I could've had at least one more piece so that I could make fluffier clouds.  I cut it into thirds and placed up top and cut them into cloud shapes.

If I had thought about it -- which I did but it was too late and I didn't want to use my seam ripper -- I would have put a yellow sun with orange rays and a smiley face in the corner.

I pinned everything to the blue felt.  At this time, I didn't have any green felt (except for the sparkly green felt that I had bought for the Christmas tree activity that I will make in a couple of weeks).  I sewed what I could, leaving the bottom part of the tree unsewn.  After I bought the green felt that took me half an hour to decide on, I sewed the rest of it.  I had to get the small pieces of green felt because they didn't have the appropriate color in the large sizes on a bolt.

 Sewing the top pieces to the blue felt was the most time-consuming.  I had to roll up a lot of it so that I could make it fit through the side of the sewing machine when sewing.  I did the long parts first -- the bottom part of the lower branch and the left side of the tree followed by the right side of the tree on up.  I sewed all of the edges of the pieces.

Lastly, I folded down the top and bottom edges and sewed across to make a "tube" to put the dowels.  My original plan was to put dowels on all four sides to make it lay flat, but I finally decided doing the sides was unnecessary.

I pushed the dowels through, as well as the cord.  I left the cord long enough so that it can be adjusted to just about any height


 Lastly, I drew the shapes of the leaves, squirrel, owl, pumpkins, and acorns on the appropriate colors.  I drew them freehanded, but while looking at pictures pulled up on Google images for help.


One great advantage is that it can be rolled up for storage or transportation.  We will be taking this to Grandma's house!


My husband had a great idea that I'm going to try to do.  He suggested putting the Bible verse on it from Psalm 1:3  - "And he shall be like a tree planted by the rivers of water, that bringeth forth his fruit in his season; his leaf also shall not wither; and whatsoever he doeth shall prosper."

If you make one for your child, please give me the link to your photos.  I'd love to see your creations.  Also, if you have any more ideas for additional accessories, let me know in the comments.

Pictures of Gracie Playing
(Graphics intensive)


Pin It!

Friday, November 18, 2011

My New Favorite Way to Shop!

Gracie and I went to JoAnn Fabrics a couple of days ago.  I don't get to go into this store very often because it's across town, but we were in the area, so I took advantage of the opportunity.  I needed to pick up some craft supplies (watch for a future post coming soon! -- if all goes well!).  Gracie is a busy, curious, active little girl who takes every opportunity to explore and investigate every interesting little thing.  I decided not to put her in a buggy, but decided to take her in the umbrella stroller that I keep in the car (one of my best purchases ever!).  I knew I was going to have more than a handful of items, so I grabbed a handheld shopping basket.  It made it somewhat awkward to push the stroller with one hand.  I looped the basket handles around the stroller handles, and it was a perfect fit!  Gracie enjoyed being able to look out at everything, and I enjoyed being able to shop unhindered.
Pin It!

Bacon, Cheese, and Potato Chowder

For some reason, I am usually drawn to potato soup recipes.  Well, it's no secret that the potato is my favorite vegetable.  This recipe, originally found in Kraft Foods magazine, is very easy to make.


Ingredients:
3 cups fat free milk (I used whole milk.)
1 can (10-3/4 oz.) condensed cream of potato soup
2 cups frozen Southern-style hash browns
1 cup shredded reduced fat sharp cheddar cheese (I used whatever shredded cheese we already had, probably the Mexican four cheese, one of our favorites.)
2 slices bacon, crisply cooked, drained, and crumbled/
1/4 cup thinly sliced green onions

1.  Mix milk and soup in a large saucepan.  Stir in hashbrowns.  Bring to a boil on high heat, stirring occasionally.
2.  Reduce heat to medium-low, simmer 10 minutes, stirring frequently.
3.  Ladle into soup bowls (makes 6 one-cup servings)
4.  Top with the cheese, bacon, and onions.

I used the green onions that I froze in the water bottle which turned out great.

I started out frying the bacon in a skillet like I normally do.  I wanted to cook the whole package of bacon to have for quick-and-easy breakfasts, but I didn't want to use the griddle on top of the stove (it gets really gross and I haven't been able to clean it since I was pregnant.).  I wondered if bacon could be baked in the oven.  I did a quick search online and saw that, yes, bacon can be baked in the oven!  I put the oven on at 350 and lined a baking sheet with foil.  I laid out the bacon strips and cooked for about 20 minutes or maybe a little longer.

I really liked how easy this was to make.  I did NOT like the sodium content.  I found a recipe via Pinterest that shows how to make "Cream of Something" soup and am going to try that out in the near future (future blog post).  Also, I have had better potato soups, but they are more labor intensive.  This works out just fine for quick-and-easy.
Pin It!

Thursday, November 17, 2011

Night-Night Mat

One of the more popular pins on Pinterest is that of a lounging mat made from sewing pillowcases together and inserting pillows.  It looks a great idea and one that would be fun and useful to have for a long time.  I would've loved to have had one as a kid.

Rather than buy brand-new pillowcases, I decided to look in my local Goodwill and Salvation Army stores to see if I could find anything that would work.  I knew I also didn't want to buy brand-new pillows because that would be crazy expensive.  I like to walk through the thrift stores gathering ideas.  About a week ago, I found a great alternative:  a bumper pad for a crib and a really cute Barbie-themed sheet.  (The only way you can tell it's a Barbie sheet is because it has the logo in one of the circles at the top.)  Surprisingly, the bed sheet was for a full-sized bed, so there was plenty for this project and enough leftover for some future project.  Total cost:  $5.98 plus tax!


Here is the blue crib bumper cut into three segments and then zig-zagged on the cut edges.

Here is the uber-cute bed sheet (folded in half).

First, I hand-stitched the three segments of the bumper together.  That's when I noticed I had some uneven edges.  Easy fix by cutting down and doing a zig-zag stitch with the sewing machine.

As you can see, I was all over the place with stitching them together.  I started off with a made-up figure eight stitch that didn't work.  Then I did another stitch and another weird technique.  It was driving me crazy because it was taking so long to stitch them together.  I didn't want to be hand-stitching on this thing for a week.  I finally resorted to stitching them together at certain points.
I laid the bedsheet out, put the crib bumper on top, folded the sheet over and then drew lines where I wanted to cut them.


This is after I sewed the long side (right sides together).  I don't know how the bottom got all un-squared.  Fortunately, I had left PLENTY of extra room, making it longer and wider than necessary just in case I had problems.  After sewing the bottom, I used my pinking shears to cut off the excess, turned it inside out, inserted the bumper pad, and was done!

Here, Gracie is posing for the picture, going "night-night" on her new nap mat.

Gracie enjoyed playing on the nap mat while Robert and I watched TV.  Here, she is riding her horsey while we watched "Have Gun, Will Travel."  She had never done that before.  I thought it was too cute!

I'm really happy with how it turned out.  In a way, I wish I could've made it thicker like the pillows, but I think this will do just fine.  Certainly can't beat the price!

Original Sources:

Source: gltc.co.uk via Ava on Pinterest


Pin It!

Wednesday, November 16, 2011

Southwestern Egg Rolls

One of my favorite menu items at J. Alexander's is their Huevas Rolls (not sure if I spelled that right).  I could eat a whole plate of them and call it a night.  I don't, but I could!  Sam's Club has sold some frozen ones that are quite good, too.

I looked at allrecipes.com to see if I could find something similar that I can make at home.

Here is the recipe that I found and tried.


Ingredients:
2 Tablespoons vegetable oil
1 skinless, boneless chicken breast half
2 Tablespoons minced green onion (did not use, didn't have)
2 Tablespoons minced red bell pepper (did not use, didn't have)
1/3 cup frozen corn kernels
1/4 cup black beans, rinsed and drained
2 Tablespoons frozen chopped spinach, thawed and drained (did not use, too lazy to thaw it out)
2 Tablespoons diced jalapeno peppers (had to use the jarred kind)
1/2 tablespoon minced fresh parsley (used dried)
1/2 teaspoon ground cumin
1/2 teaspoon chili powder
1/3 teaspoon salt
1 pinch ground cayenne pepper
3/4 cup shredded Monterey Jack cheese (I think I used taco blend or something similar)
5 (6 inch) flour tortillas
1 quart oil for deep frying (did not use)

Directions:

Rub 1 Tablespoon vegetable oil over chicken breast.  In a medium saucepan over medium heat, cook chicken approximately 5 minutes per side, until meat is not longer pink and juices run clear.  Remove from heat and set aside.  (I had to finish it off in the microwave.  In the future, I will cut it into strips and cook to make sure they get cooked completely.)

Heat remaining 1 Tablespoon vegetable oil in a medium saucepan over medium heat.  Stir in green onion and red pepper.  Cook and stir five minutes until tender.

Dice chicken and mix into the pan with onion and red pepper.  Mix in corn, black beans, spinach, jalapeno peppers, parsley, cumin, chili powder, salt, and cayenne pepper.  Cook and stir five minutes until well-blended and tender.  Remove from heat and stir in Monterey Jack cheese so that it melts.

Wrap tortillas with a clean, lightly moist cloth.  Microwave on high approximately one minute or until hot and pliable. (I did not do this step.)

Spoon even amounts of the mixture into each tortilla.  Fold ends of tortillas, then roll lightly around mixture.  Secure with toothpicks (did not do this).  Arrange in a medium dish, cover with plastic, and place in the freezer.  Freeze at least four hours.

In a large, deep skillet, heat oil for deep frying to 375 degrees F (190 degrees C).  Deep fry frozen, stuffed tortillas 10 minutes each, or until dark golden brown.  Drain on paper towels.

After putting the mix in the tortillas, I rolled them up and put them in a dish, but I didn't freeze or fry them.  We heated them up in the microwave and ate them that way.  They were quite good!  For the last one, Robert took out the mixture and cooked it with scrambled eggs to make a breakfast burrito.  That also was very good!!
Pin It!

Saturday, November 12, 2011

Blog Post Roundup (11/12/2011)

Hello Everyone!  I've been somewhat MIA for the last few weeks.  Most of my posts have been scheduled posts that I actually wrote awhile back.  We've been rather busy.  I have a few new posts coming that have to do with some projects I've been working on. (Update:  This was supposed to go out last week, but I didn't get a chance to put more than a few links.)

Here are some of the posts I've been "starring" on Google Reader so that I can share with you.


Thankful-Training

One Blogger's Confession about Blogs


Kneeling and Healing

Be Faithful

Why Children Should Not Be Forced to Share


Funny Baby Videos Go Viral

The Christian Lady's Survival Kit

Three Little Words That Lift


11 Ways to Teach Your Children to be Diligent Workers


Children, Chores, Money, and More!

Finding Your Creative Side!

Stewarding Time with Wisdom

What About the Child Who Grabs the Toy?
Pin It!

Thursday, November 10, 2011

Spiced Cider

In general I'm not a huge fan of hot drinks -- with two exceptions:  hot chocolate and hot apple cider.  I found this Spiced Cider on Pinterest and was glad when we had a cold spell so that I could make it!


Spiced Cider

Ingredients:
1 gallon apple cider
1 cup orange juice
1 Tbs lemon juice
3 cinnamon sticks
1 tsp allspice
1 tsp ground cloves

Combine all ingredients in a pot and bring to a boil.  Turn down heat and simmer for 6-8 minutes or keep warm on low.  Strain and serve.

My husband bought the apple cider and since I didn't specify a quantity, he came back with a half-gallon jug of it.  This turned out great because it was enough to keep me happy without feeling like I had to drink the whole thing before it went bad.  I don't think my husband is quite the fan of hot apple cider that I am.  So, I more or less halved the recipe, with the exception of the cinnamon.  Without thinking, I put in 3 whole cinnamon sticks (which I broke in half), and I guestimated on the lemon juice and it was probably more like 1 Tbs.

It turned out very good!  It's not so good when it has cooled down, but it's easy to warm back up in the microwave.

I look forward to enjoying this recipe for many years.

Original Source:
Pin It!

Wednesday, November 9, 2011

Nightgown Made from Pillowcase

Pinterest is quickly becoming a huge timewaster favorite way to gather ideas.  I found this cute tutorial for making a nightgown out of a pillow case.  Nightgowns are very hard to find, and I love simple, fun projects.

Laying out the pattern pieces.
 I thought I took more pictures of the process, but apparently not!  Sorry about that!

All ready for night-night!


Look! There's Papa!


I'm very happy with how it turned out.   It's big (made to be about size 4T), but that just means she can wear it longer.

A few notes about the process:

Don't use a seam ripper to open up the top part of the pillowcase.  Just use your scissors to cut open.

The hardest parts will be doing the gathering for the ruffled sleeves and attaching to the skirt.  Still, very useful techniques to learn (or re-learn, in my case).

I have never made buttonholes, so I didn't go that route.  I used double-fold bias tape (I think that's the correct name) which I already had on hand to finish off the neck and back and to make the ties.  It's a little rough and stiff for my preferences, but it'll do.  Maybe next time, I'll use blanket binding which I think is more like ribbon which would be smoother and more flexible.

This project cost me $0.99 (plus tax) for the pillowcase at the local Salvation Army.  I already had the double-fold bias tape on hand, but that's inexpensive as well, and the remaining parts can be used for other projects (like more nightgowns!).

I'm going to let her wear this even in winter.  I prefer her to wear nightgowns (though she does have some pajamas, but we will transition to all nightgowns).  For wintertime, I will have her wear "longjohns" (thermal underwear) underneath her nightgowns.  This is pretty much what I do myself.

To see what else I'm working on, or planning on working on, check out my "Do Soon" board on Pinterest.  As I complete the projects, I'll blog about them.  Feel free to "pin me."

Original Source:
Pin It!

Tuesday, November 8, 2011

Olive Garden Salad Dressing

Here is another "copy cat" recipe for Olive Garden's Salad Dressing.

Simply mix the following ingredients together in a blender or food processor:


1/2 cup mayonnaise
1/3 cup white vinegar
1 teaspoon vegetable oil
1 Tablespoon corn syrup
2 Tablespoons Parmesan cheese
2 Tablespoons Romano cheese (I couldn't find this, so it didn't go in.)
1/4 teaspoon Italian seasoning
1/2 teaspoon parsley flakes
1 Tablespoon lemon juice

This makes about a cup of dressing.  Don't do like I did and just pour it into a measuring cup.  I knocked it to the floor a few days later when getting something else from the fridge.  Big mess.

I didn't actually try it, but Robert did.  He said it was good.  I don't quite remember if he said he thought it tastes like Olive Garden or not, but he did like it.
Pin It!

PrintFriendly